New month, new Clarity Challenge.
A great one this month and endless possibilities for "Shaped Cards".
And another Christmassy one from me.

Do you get the idea that I love Christmas?
So the ingredients I used this time are:
8x6 blank base card
Clarity Olive Branch Wreath
Selection of green & blue dye based inks and Fern Green, Red Geranium & Black Archival inks
Clarity Stencil Brushes
Snowy acetate sheet
Trees, Santa & Sleigh stamps
A moon mask
"Christmas Greetings" & Small & Large Holly stamps
Red & iridescent glitter
Glue runner and Ballpoint-tip Glue Pen
Scissors and craft knife
Clear embossing powder
(Links for the Clarity ingredients are below for you)

First place the stencil directly onto the blank greeting card and brush on the different greens to build your wreath

Next, with scissors (or craft knife) cut out the upper part of the card. At first I just cut the front part of the card as I was going to build a scene on the inside of the card above the wreath, but then decided it would be better to cut the front & back above the wreath, so fixed that!

Next cut the centre aperture out of the wreath on the front part of the card only.

Use the piece you've cut out as a template to cut the snowy acetate. Remember to cut slightly larger so that you have enough of a border to run the glue tape round. Stick the acetate in place inside behind the centre of the wreath.

On the open card, mask off the left-hand side with post-it notes and stamp the trees in first and second generation inks so that they are visible through the aperture when the card is closed. (For those not familiar with the term - second generation ink - ink up the stamp, blot on copy paper, then plot on your artwork, giving a paler image).
Add the moon mask and brush on the blues for the moody sky, gives a nice darker edge where the leaf shaped card has been cut too.
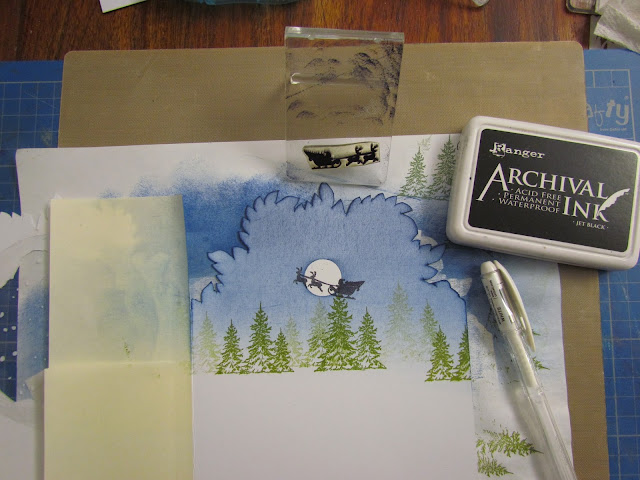
Stamp Santa flying to deliver the presents, again so that he is visible through the aperture, and use the white pen to highlight his sleigh.

Add some iridescent glitter to the trees and leave to dry.

Now on the front of the card, stamp the "Christmas Greetings" using Red Geranium Archival ink and clear emboss.
Stamp the holly using first & second generation dye based green ink.
I used some green Spectrum Noir colouring pencils to darken the wreath leaves and a grey to add a bit of shadow to both the wreath & greeting.
Using the Ballpoint-tip Glue Pen, dot on the berries and add red glitter to finish off.
There's another Christmas card made (and an idea for you for the challenge), but still lots more Xmas cards to make, so on my day off today, I guess I may well be doing some crafting!
So get your thinking caps on, and don't be shy, have a try. You could be in the random selection draw at the end of the month to win a Claritystamp voucher to spend on some fab goodies.
As the saying goes "You've got to be in it, to win it!"
There's lots of inspiration again this month from the other Design Team members too, so check out their blogs for lots of hints, tips and ideas.
Look forward to seeing your entries this month, and Good Luck to you x
Click on these useful links for ingredients above:
http://www.claritystamp.co.uk/Clarity-Stencils/16532-/Olive-Branch-Wreath-Stencil-7-x-7-Inch
http://www.claritystamp.co.uk/Clarity-Stencils/13450-/Clarity-Stencil-Brushes-Set-Of-4
http://www.claritystamp.co.uk/Information/Offers/17998-/Sprucescape-amp-Cabin---Unmounted-Clear-Stamp-Set
http://www.claritystamp.co.uk/Clear-Stamps/Christmas/18367-/Christmas-Miniatures-amp-Window-+-MASK---Unmounted-Clear-Stamp-Set
http://www.claritystamp.co.uk/Clear-Stamps/Christmas/5277-/Christmas-Greetings---Unmounted-Clear-Stamp
http://www.claritystamp.co.uk/Information/Search/17221-/Deck-The-Halls-amp-Holly---Unmounted-Clear-Stamp-Set
I do love all your art work this is another stunning card. Xx
ReplyDeleteThank you Carol - I'm going to try it with the other Christmas stencils too :-) xxx
DeleteSuperb again, Carole. I love the aperture but not quite sure my 'knife work' is up to it, being a 'leftie!' However, a circular or similar shaped die might just work. Will need to give it a try! Your blog makes great reading, an inspiration to have a go! ;~}
ReplyDeleteThank you Shelagh.
DeleteI think it would work just as well cutting the aperture out with scissors, but may be a little more fiddly. The die-cutting does sound a better option though :-) xxx
A fabulous card Carole, and great step by step instructions. Whoever receives this for Christmas will feel very special x
ReplyDeleteThanks so much Angela - your lovely comment is much appreciated xxx
DeleteA super card Carole, love your design and what a wonderful card it would be to receive. Great step by step too. Thanks for the inspiration. xx
ReplyDeleteMany thanks Naomi - I tried to cut the photos down a bit this time, but............. :-)
DeleteAppreciate your lovely feedback xxx
What a great idea Carole - super card and excellent instructions. A lovely card....wish I could find time to start my Christmas cards lol
ReplyDeleteThanks so much Linda....Go for it Linda - make the next card you make, a Christmas one! xxx
DeleteWow a lot work went into this I love this wreath would never had thought of doing this blog wa as great xx
ReplyDeleteThank you Julie - it was a fun one to do. I'm going to have a go with the other Christmas stencils too.
DeleteReally appreciate your lovely feedback xxx
Wow fabulous card. Great design x
ReplyDeleteThank you Lea - I hope you'll be having a go at entering this month? If you do, I look forward to seeing your artwork. xxx
DeleteGreat Christmas card design with lots of different details. Thanks for sharing your methods. I particularly like the snowy acetate behind your frame. x
ReplyDeleteGreat Christmas card design with lots of different details. Thanks for sharing your methods. I particularly like the snowy acetate behind your frame. x
ReplyDeleteThanks so much Lesley. I've had that acetate since last year and never quite found the right time to use it - now I'll be using it for more cards like this for sure! xxx
DeleteCarole, just read your reply above. The snowy acetate also makes great confetti on wedding cards and boxes. S xx ;~}
DeleteThank you for the tip Shelagh :-) xxx
DeleteWonderful Carole. I love Christmas as well but have yet to start my cards. Think you must have had some patience to make this. xx
ReplyDeleteWonderful Carole. I love Christmas as well but have yet to start my cards. Think you must have had some patience to make this. xx
ReplyDeleteThank you Lynne....Need to make quite a few as I'm planning on another sale here at work maybe end of October, so need to start building stock. Also set up my virtual shop on Etsy.com = Crafty Mrs Panky, so need even more cards than before! Hopefully will do well for Cancer research :-) xxx
DeleteThis comment has been removed by the author.
ReplyDeleteGreat card design, and brilliant photo tutorial...when you have finished all your Christmas cards , I could do with a helping hand with mine....hugs...xxx
ReplyDeleteLol - thanks so much Jo. Send hugs back xxx
DeleteWhat a fab card Carole. I love that snowy acetate, it really adds to that Christmas feel, and the green and red are so vibrant and festive too. I'm thinking loads of variations on a theme; maybe even a shaker card! Oh yes, its beginning to look a lot like Christmas.... Xxx
ReplyDeleteThank you Barbara.
DeleteYes, when you mentioned shaker cards, I thought that was a fab idea. I will be looking into that further for sure :-)
You got me thinking about that Christmas tune now too....."Everywhere you go...." lol xxx
Fabulous design work Carole. Brilliant use of the acetate. I love your winter scene...Hell, what's not to love !!!!
ReplyDeleteThanks for popping in and leaving me a lovely message Emma. Hope you're well :-) xxx
Delete