For October, our Clarity challenge is giving the Design Team a chance to showcase some fab Stencils to give you some inspiration, and there's some very different ideas from some of my team mates, so there's plenty of choice, and so many possibilities......
For my design this month I've used one of the newer stencils "Circles Box Frame", and to accompany it, the fab "Grace" from the "Elegance & Grace" ballerina set as seen on HOCHANDA last Sunday - Hope you caught the shows!

Ingredients:
8x8 blank greeting card & a piece of A5 Chromo card
Adirondack Inks: Eggplant, Stonewashed
Black Archival Ink
Distress Inks: Black Soot, Broken China, Worn Lipstick
Cling film & water in a spritzer bottle
"Circles Box Frame" Stencil, "Grace" Ballerina & mask, "Amazing" from Word Chains Set 9 & the stars from the Wee Folk 3 (Fairies)
Low-tack masking tape
White, Silver & Black pens & a blue Promarker
Perfect Pearls Mists - & the colour I used is "Perfect Pearl"
Brayer, Clarity Stencil Brushes & Blending Tool
If you've been reading Barbara's blog (I strongly recommend it if you haven't - it's a great light-hearted read), you'll know that the piece of Chromo card I've used (available from Claritystamp), was brayered with a couple of blue inks, then a piece of cling film was spritzed with water and laid onto the card and left to dry (Top tip - Be patient!......Go and put the kettle on while you're waiting and make yourself a cuppa!)

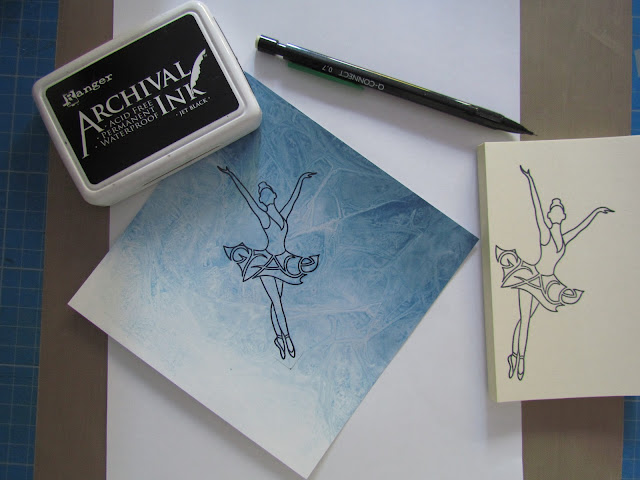
Trim the Chromo card to 6x6 and place the stencil centrally to find out where to stamp Grace, then mark in the corners where her head and feet will sit.

Stamp on Grace (not literally of course) using Black Archival ink, placing her head and tippy-toes in between the pencil marks, then mask her off.

Replace the stencil using low-tack masking tape and using the blending tool, dab through the stencil to get the pattern onto the card, using a little less above Grace's head. Drag the ink in gently with the make-up sponge.

Spitz with the Perfect Pearl Mists - they're so lovely and well worth investing in!

Remove the stencil and curve "Amazing" on the mount, then stamp in Black Archival above Grace's head!

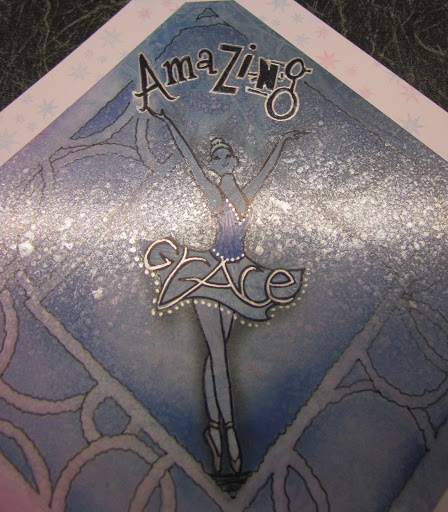
Next, using a guillotine cut the corners at 45% so that the finished artwork fits onto your base 8x8 card. Use a black Micron pen to enhance the circles of the stencil (only up as far as Grace's arms), then using the silver pen embellish the design by colouring "Grace" on the skirt and outline "Amazing". Give Grace some nice eyelashes and a lovely smile with the black Micron pen.
Use the blue Promarker to colour in the bodice of her dress, but be careful not to touch the outline as this will make the line art bleed.
I never took a photo, but you also need to add shadow around Grace, so I masked her again and used a makeup sponge and Black Soot Distress ink to do this.

Brush the edges of the artwork with Worn Lipstick Distress Ink.......& I felt the need to spritz again with the Perfect Pearls Mists.........so I did!

Thought I'd take a couple of photos to show the card once it had it's final spritz - I love those Perfect Pearls Mists (I couldn't resist buying all the colours available - they add a lovely subtle finish to the artwork), and they catch the light beautifully.

Stamp the base card with the stars using Worn Lipstick and Broken China Distress Inks, then mount the artwork diagonally and trim the base card back to within 1/2" around the artwork.

That's basically it.....I hope you like the end result - I think I may well be making this design in different colours too?

By the time you get to my blog, you've probably already checked out the rest of the Design Team's artwork, but if not, there's some fab inspiration there to spur you on to get creative, so take a peek.
I hope you'll put your thinking caps on to have a go at this month's challenge.....There's some very talented crafters out there, and I'm sure you're one of them, so don't be shy to showcase your work, we'd all love to see it!...There's a £50 Clarity voucher up for grabs for the lucky, randomly selected winner.
Not only will this be a Challenge Competition for you to enter, but every month, it sure is "a BIG Challenge" for us too, to choose our Top 5 favourites!! Have fun creating and I'll be looking out for your artwork.
Until my next post, hugs to you all xxx
I love all your cards you make everyone is just so nice, you have made another stunning card. Xxx
ReplyDeleteThanks so much Carol - appreciate you visiting my blog and leaving such a lovely comment. Have a good day xxx
DeleteBeautiful. Those perfect pearl mist are a super idea. Great design.
ReplyDeleteThanks Naomi - I highly recommend those Perfect Pearls...if you don't have them already, they're well worth investing in :-) x
DeleteBeautiful artwork. Lovely!
ReplyDeleteThanks so much for popping in Barbara - Grace is beautiful :-) xxx
DeleteA stunning piece of art , and thank you for sharing how you created it...especially the photo that shows the mister....as this isn't always easy to see....
ReplyDeleteI just love these ballerina stamps....as I do think many of us have dreams to be one of them ....one day.....( I know.....dream on Jo !!!!!! ) Hugs.xxx
Hi Jo - you know that more recent NDC stamp "Follow Your Dreams".....so I look forward to seeing you next time dressed in your tutu - I'll try to remember to wear mine too to the next Open Day! :-)
DeleteThanks for stopping by to leave your lovely message & have a wonderful weekend xxx
I like this I know you say you use blue all the time but I think what you have done works like your blog x
ReplyDeleteThanks so much Julie :-)
DeleteHave a lovely weekend - it's set to be sunny here, hope the weather will be good where you are too xxx
Carole I love this she looks gorgeous, thanks for sharing how you did it and I love the spritz of pearl xx
ReplyDeleteCarole I love this she looks gorgeous, thanks for sharing how you did it and I love the spritz of pearl xx
ReplyDeleteThank you for stopping by Linda - it was a fun piece to make and I lurrrrrrrrrrve those ballerinas :-)
DeleteHave a great weekend at Port Sunny! xxx
Hello Carole. What a beauty. I love this and your techniques. Very inspirational. Hugs xxx
ReplyDeleteHello Carole. What a beauty. I love this and your techniques. Very inspirational. Hugs xxx
ReplyDeleteThanks so much Emma. Send hugs back xxx
DeleteWhat a beautiful card Carole. I had no idea that Grace was quite so sparkly and shimmery; just gorgeous. The combination of the blue and the pink is so atmospheric too. Xxx
ReplyDeleteThank you Barbara - Sometimes it's quite hard to capture all the glitzy bits in a single photo isn't it. I suppose that's why our blogs are the best way of showcasing our artwork :-) Lots of pics.....and when it doesn't show, we can describe it :-) A new version of "show & tell" lol xxx
DeleteAnother stunner, Carole, simply beautiful and your gentle colour choice is so appropriate for the subject. All the extra little touches you add make your projects so special! ;~}
ReplyDeleteAnother stunner, Carole, simply beautiful and your gentle colour choice is so appropriate for the subject. All the extra little touches you add make your projects so special! ;~}
ReplyDeleteThat's really sweet of you to say Angela. They always just "evolve" as I'm going along. I never really have a plan, and it seems to work well :-) xxx
DeleteSorry Shelagh - I was looking at Angela's name on the next comment - my mind is ahead of the game! lol xxx
DeleteA lovley composition Carole. The colours work so well with the graceful dancer. I'm loving the Perfect Pearl mists too will keep an eye out for them xx
ReplyDeleteHi Angela - thank you for your lovely message. I can't recommend those Perfect Pearl Mists highly enough. You can spray them onto your artwork and the colours still show through, but it just gives a lovely shimmer. I got mine on Amazon.
DeleteHave a lovely day xxx
(I should call you Shelagh as I used your name when replying to Shelagh above lol)
Lovely card Carole and very informative step-by-step. Clever idea to combine the "Amazing" and "Grace". I like the little white dots around her dress, they don't show up so much in your main photo. x
ReplyDeleteLovely card Carole and very informative step-by-step. Clever idea to combine the "Amazing" and "Grace". I like the little white dots around her dress, they don't show up so much in your main photo. x
ReplyDeleteThanks so much Lesley - I think the dots on the dress don't show up as I used a sliver pen and you have to catch it just right in the light when photographing it. It may be a good idea to use solid white rather than silver - I think it would photograph a lot better?
DeleteNext time eh? :-)
Thanks for popping by and have a lovely weekend xxx