Well I wasn't sure what to do and had so many ideas going round in my head, so I tried to keep an open mind and went out and bought lots of "stuff" which I kept thinking "oooo - that'll be nice decorated." So now, I have lots of projects that I'll work on over the coming weeks.....
So for this month's challenge, I decided to go with a glass lantern (bought very reasonably priced in Poundland.....& guess how much it cost????).
Here's the finished item......

And here's the ingredients:
Poundland glass lantern
White tissue paper
Claritystamp "Remountable Hares" and the "Heart weave" stamps
Cornflower Blue, Black & Olive Ranger Archival ink pads
Cosmic Shimmer Vintage Ink Spray Mist - Evergreen, Purple Orchid, Arctic Blue & Clover
Tim Holtz Distress Re-Inker - Mustard Seed (small amount decanted and mixed with a tiny amount of water in a spritz bottle)
Martha Stewart (or similar) Decoupage Glue & Sealer
Large soft brush for applying the decoupage glue
Small paintbrush
Lay the tissue paper out on a sheet of plastic to protect your surface and spray the inks randomly as you like, then stamp the heart weave using the Cornflower Blue archival ink.

(You may notice that a bit of yellow has crept in - I thought this needed a bit more of the rainbow so I spritz some watered down Mustard Seed Distress Ink on the tissue paper as well).
Tear the tissue into manageable sized pieces. Coat the jar all over with the decoupage glue and allow to dry.

Pick up the jar by placing your hand in it, this helps when applying the glue so that you don't get glue all over your fingers. Paste a thin layer of glue where you want to place your first piece of tissue and gently press the tissue onto the jar with the glue brush and add a little more glue over the top to seal it. Be careful not to brush too hard - if the tissue tears, you can place another piece on top, that's the glory of decoupage, but you don't want too many layers of tissue or the glass won't be as opaque. Continue to add the torn tissue in the same way until the whole jar has been covered with the first layer.


Stamp the hares onto the tissue and tear them out close to the outline, then use a wet paintbrush to remove the excess tissue as close as you please to the hare's image.
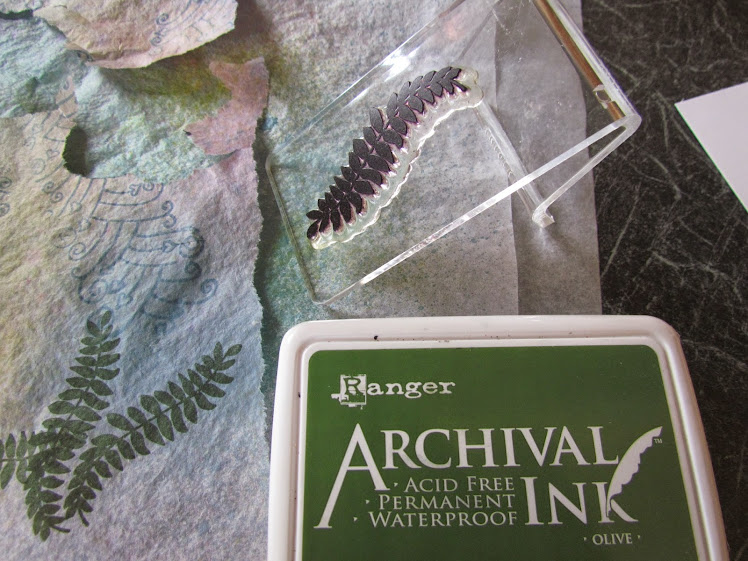
Use the same technique for the fern leaves

Next, decide where you want your images on the jar and repeat the glue and stick technique around the jar until you have completed your little scene. Once you've finished sticking all your images on, gently paint a thin coat of glue over the whole thing to seal it and hang it up somewhere to dry completely.
So there you have it - A pretty inexpensive way of lighting the garden in the summer evenings, or a sweet gift to give.

Have fun with your Clarity stamps - the possibilities are endless....I'm thinking the "Wee Folk" would look great on these bargain jars!
Enjoy designing your "Anything's" and I look forward to seeing your creations!
Send crafty love to everyone xxx
Hi there Carole. You do know there is going to be a run on these jars at Poundlands all over the country now!!! This is a fabulous bit of artwork and a fabulous tutorial too. Thank you for sharing. Hugs xxx
ReplyDeletep.s. will be popping in to poundland later in the week xx
I should maybe ask Poundland for commission! lol Let me know if you find them ok xxx
DeleteWhat a great idea to brighten up the garden. Like Emma I now think that Poundland will be having the shelves emptied of these jars xx
ReplyDeleteThanks Sazzle - I'm going to visit the 99p shop too - even better value!! lol
DeleteTake care and have a lovely Sunday xxx
Hi Emma - I know Amanda O's already been there!! Great to share and just proves crafting doesn't always have to be ultra-expensive. Poundland have some great stuff in there - take a look on the crafting section for the hessian and ribbons too :-)
ReplyDeleteHave a fab Sunday - I'm off to craft shortly... Send hugs back to you Emma xxx
Another project with lots of shared tips and techniques, thank you Carole. There are endless possibilities for your lantern and with Easter hovering, wellllllll! I'm always on the lookout for ideas to make thank you gifts for my mum's many carers. ;~}
ReplyDeleteYou're right Shelagh, I think these would make perfect inexpensive gifts, especially if you are only acquainted with someone and don't know personal tastes. Would love to see them if you do get round to having a go :-) xxx
DeleteThis is such a great little project Carole. Are you on commision? I have a feeling these little jars will be selling out soon! Thanks for all the detailed instructions, I may be giving this a go. Xxx
ReplyDeleteIt was fun to do Barbara - Can't wait to try one with the wee folk fairies and elves They'll be perfect for these little jars lit around the garden xxx
DeleteHi Carole, I love how you've decoratd these jars, such a clever idea. They'll be great decorating the garden on a summer evening with bbq going. Thanks for sharing how you did it - may just have to give this a go myself. Hugs xx
ReplyDeleteIt's very easy to do Angela - mine took ages to dry as I over-did it with the glue...see where I've mentioned a thin coat :-) I am a bit impatient as well and hate waiting for things to dry! Patience is a virtue and all that....xxx
Deletewhat a transformation! I love it and thanks for sharing how you did it. Now you need to make some more and then you can have them around in the garden this summer - I can just see you sat there early evening on a warm sunny night lots of little lights around you and a glass of something nice ! x
ReplyDeleteThank you & roll on summer eh Linda......mind you, it doesn't stop me having a little tipple in the winter, or any other season for that matter! LOL I will have to get making some more in preparation for those warm summer evenings - fingers crossed we'll get a good one this year! xxx
DeleteSo like this just shows what you can come up with a little imagination goes a long way hope you get to enjoy in the summer months xx
ReplyDeleteHere's hoping for a great hot summer - I think we all need a bit of sunshine! x
DeleteCarole, such a wonder idea, hope those lovely warm days come soon. Thanks for a super step by step too. It's beautiful and I'm sure it will be magical in the garden when lit. Love it. xxx
ReplyDeleteThanks Naomi - looking forward to making a few more - that's if Amanda & Emma haven't bought all the stock!!
DeleteYes.....roll on the warmer weather!! xxx
I love this Carole, I'm going to have a go with my glass jar this week hopefully. Thanks for the inspiration. My mum loves it too! Xx
ReplyDeleteAwww - that's sweet of your Mum Amanda :-)
DeleteDon't forget to only apply thin layers of the decoupage glue - although mentioning the glue, I think it would probably work just as well with normal PVA. The last time I did decoupage was when I was at school, so it's a fair few years ago and I'm sure that "decoupage" glue wasn't around then! I have a lot of PVA, so I may try that on the next one - it dries clear so should have the same effect! We'll see.....
Can't wait to see you jar - have fun with it :-) xxx
I have also been having fun with tissue paper and the hares stamp this month. I will definitely be copying your great idea and making some some tea light holders for the summer. I used PVA glue on my bowl and it worked fine, never tried it on glass though. x
ReplyDeleteYour bowl looks great Lesley - I need to get to all the blogs to have a read of them, but this laptop is driving me mad and keeps bombing out on me! Will try again now I'm up-and-running again. Good luck with your tea light holders x
DeleteThis is lovely Carole. We do tend to set ourselves up with lots of projects. My head is full of ideas. Made me smile your comment about Poundland, dearest hubby actually asked once how much something cost when in there. I was in stitches. xx
ReplyDelete