Friday, 8 December 2017

December 2017 FINAL Clarity Challenge - Designer Papers & Parchment

Hi Folks - It's getting that little bit more wintery now isn't it, but to be honest, I wouldn't want it any other way for Christmas!  I personally have no interest in having a BBQ'd turkey on the beach in Australia during the festive season - it doesn't seem right does it?! 


Cozying up indoors with family & friends when it's cold outside is the way to go!


For this final Clarity Challenge, my inspiration uses stamps and stencils to go with the beautiful Designer Papers.........


Ingredients (see links below):
7x7 Stencil card
8x8 base card
Designer paper of your choice - I used a piece from Rainbow River paper pad. Nice Christmassy colours.
Holly stencil - ON SPECIAL THIS MONTH @ £2.50 - grab it while you can!
Blending Tool - WHOLE SET ON SPECIAL THIS MONTH @ £10.00
Holly leaf outline stamp & mask set
Small Reindeer from Christmas Carol 2 stamp set
Tree line from the snow globe stamp & mask set
Moon mask and stencil brush
Olive & Coffee Archival inks
Cranberry Crush, Amazon Trail & Dry Weed Artistry inks
Green Viva Décor Acrylic paint
White & clear embossing powder
Black Micron, White Gel, and Clear Stardust pens
Glue tape runner, liquid glue, ribbon
Loved making this as the holly stencil is one of my "go-to" Christmas all time favourites, and a bargain this month too!  (Check it out using the link below to www.Claritystamp.com)


Firstly, attach the holly stencil to the 7x7 stencil card with low-tack masking tape.  Use the blending tool, (or sponges if you prefer), to ink the leaves in green and the berries with red.  Don't worry if the colours overlap into each other, I think this looks great.  Remove the stencil and use a black Sharpie or Micron pen to outline the leaves and berries. Highlight the berries using the Clear Stardust pen.
With a stencil brush and some green Viva Décor paint, add a sketchy edging to the stencil card.  Try not to over-load the brush, take a little paint at a time until you are happy with the coverage.
On a piece of Clarity Designer Paper, stamp the Holly Leaf aperture in black ink and cut it out.
Stamp the reindeer in Coffee Archival ink, then place a moon mask in the sky and lightly dust across the leaf using a stencil brush loaded with an Artistry ink slightly darker than your chosen coloured paper.  Colour the reindeer with colouring pencils.

Dust the leaf with talc and stamp the trees in Olive Archival ink. Sprinkle with clear embossing powder and heat set. Lighten the area below the trees with a white pencil as though the ground is dusted with snow, then use the white pen to add snow to the trees and snowflakes in the sky.
On an off-cut of the same Designer Paper sheet, stamp the greeting banner with Versamark, white emboss it and cut it out.
Assemble the card using a glue tape runner for the leaf and banner, then mount the artwork onto an 8x8 base card.  Finish off by attaching a bow using liquid glue.
Don't forget to use your Bespoke Stamp on the back of your card!
Enjoy creating a piece of art for the final Challenge and I l👀k forward to seeing all your lovely entries 💖

MERRY CHRISTMAS ONE AND ALL - Have fun! x


https://claritystamp.com/products/artistry-ink-blending-set
https://claritystamp.com/products/holly-leaf-outline-mask-br-unmounted-clear-stamp-set
https://claritystamp.com/products/christmas-carol-2-reindeer-robins-br-unmounted-clear-stamp-set
https://claritystamp.com/products/snow-globe-outline-mask-br-unmounted-clear-stamp-set
https://claritystamp.com/products/embossing-powder-super-fine-15ml-clear-gloss
https://claritystamp.com/products/pigma-micron-01-fine-point-pen-black
https://claritystamp.com/products/gel-pen-white-29250
https://claritystamp.com/products/gelly-roll-pen-stardust-clear
https://claritystamp.com/products/crafters-companion-br-extra-strong-permanent-glue-tape-pen
https://claritystamp.com/products/viva-decor-acrylic-paint-dark-green

Friday, 3 November 2017

November 2017 Clarity stamp Challenge - Christmas Time


Hi all, long time no blog from me!  Sorry to have been away for so long, did you miss me?

A simple inspirational piece this month from me for the November Clarity Challenge - Christmas Time....
Sometimes back to basics is good as we often get tied up in trying to come up with new things to showcase and forget the good old faithful techniques which can give great results.  Things don't always need to be complicated right.....?
Ingredients:
Red sticky-backed felt (mine is from Hobbycraft)
Christmas Jumper & Mask set
Star stencil from the Christmas Wreath set
7x7 Stencil card & a piece of slightly larger card to back the artwork
8x8 blank greeting card
Christmas Corners Holly stamp
Banner stamp
Perga Liner Pencils
Versamark Ink, Olive & Jet Black Archival Inks
Silver embossing powder
Glossy accents, fine red glitter, foam pads, white pen & glue pen

Stamp the jumper onto the red sticky-backed felt using Archival Jet Black ink.  Make sure it's dry, then cut it out.
Dust a piece of 7x7 stencil card with talc, tape the star stencil in place and squish Versamark ink through it.  Remove the stencil and sprinkle silver embossing powder over the stars and heat set.
Peel the protective backing off the jumper and stick in place on the stencil card. 
Stamp the single holly sprig using Olive Archival ink on a small piece of scrap card, and colour with Perga Liner Pencils.  Cut it out and use the glue pen to stick it onto the jumper.  Apply the glue to the back of the holly and gently press and hold to bond to the felt.
Using Black Archival ink, stamp the banner onto a spare piece of stencil card and colour in with one of the Aqua Perga Liner pencils. Blend the colour using a fine paintbrush, darker where the shadow would be in the creases. 
Stamp the Holly Corners using Olive Archival ink.
Before adding any of the embellishments, it's easier to mount the artwork onto contrasting card using a glue tape runner.  (I used red Mirri card as my backing card to contrast with the fluffy jumper).  Mount on an 8x8 base greeting card. 
Using the glue pen, add some red glitter to the Holly corners.
Attach the banner using foam pads and add snow using the white pen. 
Finally, add snow to the holly on the jumper and carefully add Glossy Accents to the berries.
That's it finished!
Hope you will find time to enter the November competition to be in with a chance of winning a £50 Clarity Voucher.  The competition closes at midnight on 30th November so you have time to create a masterpiece over the next four weeks.  
Once all the entries are in, Barbara will select a winner to be announced at the beginning of December.
Christmas is fast approaching so this is a great opportunity to start your Christmas cards and enter the competition at the same time.
  All you need to do is load a photo of a card you've made (using only Claritystamp products) onto the Clarity Worldwide Facebook page - please make sure you click on the "pinned post" at the top of the page before loading.
Check out all the other entries and feel free to leave comments for any of them.   After all, it's nice to share ideas and encourage one another.
I look forward to seeing everyone's creations during the month.....Good luck to you all x


November 2017 Clarity Groovi Challenge - Christmas Time

Hi Groovi-babies
I thought this month I would prepare an inspirational piece using my newly learned parchment skills.  It's a great journey to be on, especially with the Pergamano experts on-board at Clarity - A big shout-out and "thank you" to Rosie Cotterell, Linda Williams & Tina Cox.  Having met these ladies at the Clarity Open Day & Ally Pally, they are so lovely and always willing to help out if you have any questions - Very inspirational ladies they are!
A huge big thank you to Barbara too - if Clarity hadn't come up with the Groovi system, I never would have attempted parchment, but now I have a new-found crafting passion!
I enjoyed making this Christmas card and hope you get some ideas & inspiration from it so that you can create a piece of artwork using the Clarity & Pergamano goodies to enter this month's competition?
Ingredients: (see below for links)
Lightwave (in my opinion, a necessity when using the beautiful coloured parchment)
Rainbow River designer parchment and paper
Groovi or Pergamano tools for embossing & shading
Groovi Framework Squares
Groovi Nested Square and small alphabet plate
Jayne Nestorenko Winter scene sled plate
Square piercing plate
Scissors (of your choice - mine are the Pera cutters)
Mat for embossing and colouring
8x8 blank greeting card
So firstly, choose a beautiful piece of the new coloured parchment - this came from the Rainbow River pad. Emboss four squares from the Framework Squares plate onto the side saturated with ink - the largest of each of four squares first, then the second largest inside each square.
Take the large Nested Square plate and emboss a large square to frame the whole piece to make it look like a window frame.


Emboss Jayne's scene into the lower half of the frame, with a few tree branches in the upper half, making sure that you avoid the embossed frame as you work across the parchment.
Emboss snow onto the scene using the largest No. 6 ball tool or the Pergamano 12mm Shader and leave it to rest while you create the outer frame from the Nested Square plate to decoupage over the artwork to create the 3D effect.  Do this on a piece of plain parchment.  Emboss a pattern onto it from the Farmhouse Texture plate to give a wood-effect then colour it in on the reverse using either the Perga Colours Exclusive or Distress Marker pens.
Pierce round the trees and hills and also the window frames using the basic straight square piercing plate from the front.  Cut out using your chosen scissors or cutters - I used the Perga Cutters to picot cut, but use whatever your preference is for the cutting. 
Take the contrasting designer paper to the piece of parchment you've chosen and place the picot cut parchment scene over the paper so that you can get the moon mask in the correct place.  Lift the parchment and stipple the moon in place through the mask using a blending tool with either Versamagic Cloud White ink or white acrylic paint.  Add some snow with either a white pen, or the end of the No. 1 Groovi tool if you're using acrylic paint.


Assemble the artwork by using a glue runner around the edge of the designer paper to attach it to an 8x8 base card, then use the glue runner to attach the snow scene in place. Use foam pads on the large frame to create the 3D effect on top of the base artwork.


Hope you are inspired by this piece and the other Design Team ladies so that you can join in this month?
The winner will be chosen by Barbara at the beginning of December and will win a £50 Clarity Voucher to spend on anything on the Clarity website www.claritystamp.com


I look forward to seeing all your artwork when you load your photos onto the pinned post at the top of the Groovi Worldwide Facebook page.  (If you have any problems finding where to enter, shout out to the lovely Groovi community, or any of the design team or Clarity folk at head office, there'll always be someone more than willing to help you).


You have until midnight on 30th November to load your photo.  I look forward to seeing all the entries.....Good luck to you all xxx


Wednesday, 1 March 2017

Clarity Challenge March 2017 - "It's a man's world"

Hi there - good of you to pay me a visit.  Trust you are doing ok?
Well spring is on it's way....lots of flowers showing off their colourful blooms, so hopefully the sun will shine a little more often now that we're into March?!?
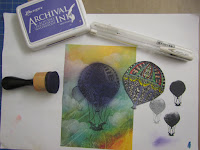
Our theme for the March Clarity Challenge is "It's a man's world" so I've chosen to go with the Filigraphy Hot Air Balloons teamed up with the fab Northern Lights Designer Paper (from the collection of four - good value and great quality too).
So what you need is:
Filigraphy Hot Air Balloon Stamp Set
A piece of Northern Lights Designer Paper
A page out of an old book
Black & Purple Archival Inks
Cloud Mask, VersaMagic Cloud White ink & blending tool
Contrasting colouring pencils
Clear Star Gelly Roll Pen and a white pen (I used a Posca, but any will do)
Promarker to edge the artwork
5x7 blank greeting card
Firstly stamp the large Filigraphy Balloon onto a book page in Archival Black ink and cut it out - just the balloon, not the basket.
Choose a sheet of Northern Lights Designer Paper and stamp the large Filigraphy Balloon and trim it down to the required size to fit onto the base card.
Using the Cloud Mask, the VersaMagic Ink & a blending tool, put in some dreamy clouds around the balloon (it doesn't matter if you go over the balloon as this will be covered by the cut-out).

Next, stamp the smaller balloon in second generation ink (ink, blot, plot), and use the blending tool and Purple Archival Ink to add some depth and shadow to the artwork before sticking the cut-out balloon in place.  I used a glue runner for this. Colour in some of the balloon with contrasting colouring pencils.  Run a Promarker or Sharpie around the edge of the designer paper and glue to the base card.
Add some highlights with the Clear Star & white pens and that's it finished!
An easy one this month, but I quite like the colours and simplicity of it.
Hope March turns out to be a good month for you, and I look forward to you visiting my blog again soon.  Would be lovely if you left me a message...........
Happy crafting and good luck if you enter the Challenge.  I look forward to seeing your artwork on the Clarity Worldwide Facebook page. xxx

Wednesday, 1 February 2017

Clarity Challenge February 2017 - "Flower Power"

Hi everyone, thanks for coming to visit my blog.
For this month's Challenge, we have Flower Power and there are countless floral Clarity stamps & stencils, so there's plenty of choice for creating a piece of artwork and entering the competition!
I thought I would go with the January 2017 New Design Club stamp - this is a great club to belong to and for just £5 per month, per club  - either stamp, stencil and/or Groovi, any combination of whatever you fancy.  For each membership, you receive a monthly brand new design with a great inspirational pamphlet from Barbara with a couple of ideas to start you off.  Well worth considering joining up if you're not already a member - visit https://claritystamp.com/pages/newdesignclubs for details.  This also entitles you to 10% off your Clarity purchases!
So on with my piece of artwork.....
Ingredients
7x7 piece of watercolour paper & an 8x8 base card
Jan 2017 New Design Club stamp No. 123 Rose Vase
Word Chains - No.'s 2, 3, 6 & 8
Bursts Powders by Ken Oliver
Embossing powder - Clear & White
Corner stamp from Sketchy Paris Fashion set
Black Archival, Versamagic Watermark  & Ocean Reef Artistry Inks
Perfect Pearls Mists
Black Promarker, a Stabilo point .88 pen & Watercolour pencils

Firstly, dust the watercolour card with talc and stamp the Rose Vase inked up with the Versamagic. Sprinkle with White Embossing Powder and heat set. (I cut masks for the Rose Vase at the beginning, but decided it was better to use the masking fluid as the masks didn't stick down all the way round in order to protect the whole image whilst using the Bursts).
Paint on the masking fluid and allow to dry before continuing.  Choose the colour Bursts that you want to use - I chose Pthalo Green & Ultramarine mix for the top and Alizarin Crimson & Sepia for the base of my piece.
Cover each section with post it notes where you want the divide where the vase is and VERY LIGHTLY sprinkle the Bursts onto the artwork - a little goes a long way with these powders as they are so vibrant. (Brilliant value and last ages). Spritz with water and watch the magic happen.  Do each of the colour combinations separately and wait for them to dry (As you can see I got a cool second background piece by placing another piece of watercolour paper onto the bursts whilst wet).  You could always speed up the drying process with a heat gun - using this method, if there's enough water on your paper you can direct the heat to get some cool patterns too if you wanted to by blowing the water with the heat.
Wait for the whole thing to dry completely before continuing. Mask off with post its as before and spray with the contrasting Perfect Pearl Mists.  For mine, I used Blue Raspberry at the top and Interference Red & Perfect Copper at the bottom.  Leave to dry.

Next, crop the artwork equally on each side and rotate the pieces.  Choose the words to stamp onto the pieces and use Black Archival to stamp them, then clear emboss. 
Colour in the Rose Vase - I used watercolour pencils here. Use the Stabilo pen to define the line between the colours and scribble under the vase for shadow (I used a wet brush to blend the pen lines - it reacts well with water).
Edge the main piece and the outside edges of the other pieces with the Black Promarker and stick the pieces to the base card. With second generation ink, i.e. ink, blot, plot, stamp the Sketchy Corner into the top corners of the centre piece and the bottom corners of the outer pieces. 
 
 That's it - All done!  (Mmmmm, it's slightly crooked so I may have to remount on another card - lol)
Have fun creating a piece of artwork to enter the Challenge.  The winner will be chosen by Barbara after 28th February, so you have plenty of time to put your thinking caps on to come up with something.  Simple to enter now too, just load your artwork on the pinned post trail on the Clarity Worldwide Facebook page.
Good luck xxx
https://claritystamp.com/products/word-chain-3-stamp-set
https://claritystamp.com/products/word-chain-6-stamp-set
https://claritystamp.com/products/word-chain-8-stamp-set
https://claritystamp.com/products/embossing-powder-detail-clear
https://claritystamp.com/products/embossing-powder-detail-white
https://claritystamp.com/products/sketchy-paris-fashion-mask-br-unmounted-clear-stamp-set
https://claritystamp.com/products/archival-inkpad-black
https://claritystamp.com/products/versamagic-watermark-inkpad
https://claritystamp.com/products/ocean-reef-artistry-ink-pad

Thursday, 5 January 2017

January 2017 Clarity Challenge - "Animal Kingdom"

Hi there!  Happy New Year to you and I hope 2017 brings lots of good things your way!


So for the new year, as you will have seen on Barbara's blog, the Claritystamp Challenge has a new location on Facebook where the Design Team will be posting some inspirational pieces throughout the month to give you ideas, and hopefully encourage you all to join in?!? 
Midnight on 31st January is the deadline to get your entries posted. Barbara will then choose a winner who will receive a £50 Clarity Voucher......As you know there's a huge selection of goodies to spend the winnings on!
And so to my card.......
Unlike my usual blog - this one lacks photos - my camera ran out of charge and I'd mislaid the charger.  Happy to report though, a replacement charger arrived today so I'm rockin' & a rollin' again now the camera has power!  The only photos I have this month though, is a start & end photo.

My piece was made using the following ingredients:
Piece of 7x7 Stencil Card
8x8 blank greeting card
Design Club Elephant stencil
Flower Power Stencil
"Elephant" word stamp
Clarity Stencil brushes/blending tool
Talc
Versamark pen
Versamagic inkpad
Un-mounted alphabet word chains
Black Sharpie pen for the doodling
A piece of sequin waste or you can use the Dotty Wave Stencil
Black Archival Ink and a selection of pastel Distress or Artistry Inks
Clear Embossing Powder
Perfect Pearls Mist Spray - Colour used is "Perfect Pearl"
(See below for links to the Clarity website for most of the above)

To get the correct place to stamp the "Elephant" word, tape the 7x7 elephant stencil on a piece of stencil card (hinged at the top so that you can lift it), and mark the eye and underside of the elephants belly lightly with a pencil.  Lift the stencil and using Black Archival ink, stamp the "elephant" - placing the first "e" of the word where the eye is marked, and make sure the rest of the word stays within the other line under his belly.  Doodle within the letters with the Sharpie pen and  dust with talc.  Using a Versamark pen fill in the letters and sprinkle with clear embossing powder & heat-set.
Flip the stencil back onto the artwork and using a grey dye based ink with either a Clarity stencil brush or blending tool, colour him in.  Once you're happy with the colour, keep the stencil in place and press a Versamagic Inkpad into the stencil so that you can emboss the whole elephant.  Sprinkle with clear embossing powder and heat-set.
Next pick various parts of the Flower Power stencil and using dye based inks, randomly add colour to the background moving the stencil as you go, for this I used a blending tool.  Fill in the gaps using either the sequin waste or Dotty Wave stencil and the same colours used for the flowers.
Next, to blend all the colours, (I love to use the Perfect Pearls Mists - they manufacture a great range of metallic colours, but for this project I used "Perfect Pearl"), spray the artwork all over with the pearlized spray - it blends all the colours perfectly and gives a lovely sheen to the artwork.  The elephant looks cool too as though he's been splashing around in water!
Once the work is dry, add "Never Forget" using the alphabet stamps and black Archival Ink.
Trim back the stencil card and edge with a grey Promarker or Sharpie and add shadow around the elephant & letters.  Lastly, doodle round the edge with a black Sharpie pen to frame it.  
Mount on contrasting coloured card or paper, then onto an 8x8 blank greeting card.
Hope you like him.
Now that Clarity has a Facebook page dedicated to the Challenge and has a global audience, I look forward to seeing some Clarity art from all over the world.
Good luck everyone - and most of all, have fun creating your Clarity artwork!
Love and best wishes for a great year ahead.
Carole xxx


https://claritystamp.com/products/stencil-card-7-x-7-100-sheets
https://claritystamp.com/products/ndsc-14-elephant-stencil-7-x-7
https://claritystamp.com/products/flower-power-stencil-7-x-7
https://claritystamp.com/products/versamark-pen
https://claritystamp.com/products/versamagic-watermark-inkpad
https://claritystamp.com/products/dotty-wave-stencil-7-x-7
https://claritystamp.com/collections/all-stamps/products/alphabet-word-chains-br-unmounted-clear-stamp-set
https://claritystamp.com/products/embossing-powder-detail-clear