Sets 1 to 4 available from www.claritystamp.co.uk
Here's my finished card for this month......

And here we go with the details for it.....
Ingredients:
Clarity Chromo Card
Wee Folk Fairies & Elves Sets 3 & 4, Toadstools, Large & Small Birch Leaf stamps
Toadstools & Moon masks
Adirondack Butterscotch, Eggplant & Mountain Rose, Black Soot Distress Ink, Ranger Black Archival, Pink & Silver Brilliance Inks
Brayer, Clarity Blending Mat & Blending Tool
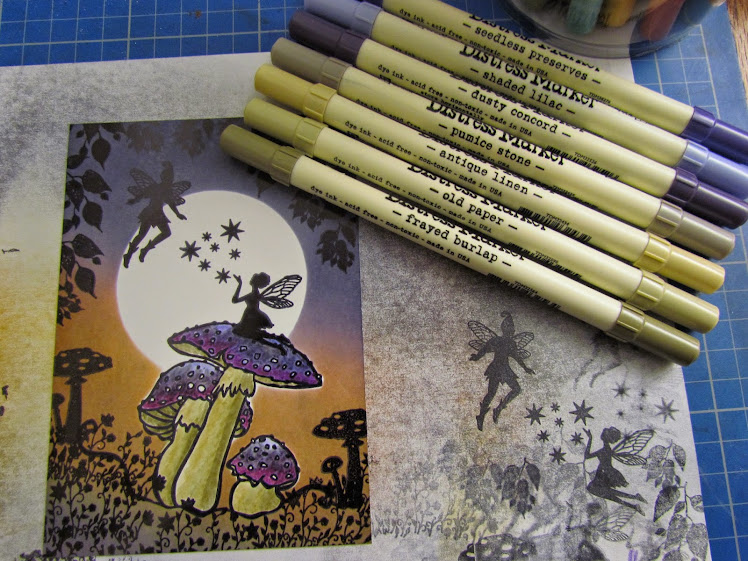
Distress Markers - Colours as shown in photo below
Jo's Bubbles Stencil
Pilot White Marker Pen

Cut the Chromo card in half and stamp the toadstools in place using the Black Archival ink. Once dry, place a mask over the toadstools and then decide where you want the moon and add this too.
Press the Eggplant Inkpad onto the blending mat and spread out using the brayer. Starting at the top corner, use the brayer diagonally across the card, covering halfway down with the first colour.

Turn the artwork round, brayer a little of the Eggplant across the opposite corner, then work with the Mountain Rose across the middle of the card, all the time brayering diagonally until the colours are blended.
Add a little Black Soot to the upper half to darken the Eggplant to make the sky a little more moody.

I wanted the colour a little more yellowy, so added some butterscotch across the middle.

Decide which Fairies, Elves and Toadstools you would like to use, remove the masks and stamp them onto your artwork using Black Archival Ink.

Add the Birch Leaves around the edges

Colour in the toadstools using a selection of Distress Markers

Using the residual dark ink from the blending mat, soften the edge of the moon around one side by lightly applying some ink using the blending tool.
Change the foam pad, then using the Brilliance Inks and Jo's Bubble Stencil, apply the ink through a few of the holes.
Using the white pen, add some details to the Fairy & Elf, then outline the silhouettes to accentuate the moonlight behind them.
Mount your artwork onto a contrasting piece of card exposing a thin border, stamp some stars onto a blank card using the Silver Brilliance ink, then finish by mounting your artwork onto the star-stamped greeting card.
I hope you're inspired by this and all the other artwork from the Design Team this month.
I look forward to seeing your designs for this month's challenge and Good Luck to you all!
Happy creating, Carole X