Tuesday, 1 September 2015

Clarity Challenge 31 - Shaped Cards

Hi All
New month, new Clarity Challenge. 
A great one this month and endless possibilities for "Shaped Cards".
And another Christmassy one from me.

Do you get the idea that I love Christmas?
So the ingredients I used this time are:
8x6 blank base card
Clarity Olive Branch Wreath
Selection of green & blue dye based inks and Fern Green, Red Geranium & Black Archival inks
Clarity Stencil Brushes
Snowy acetate sheet
Trees, Santa & Sleigh stamps
A moon mask
"Christmas Greetings" & Small & Large Holly stamps
Red & iridescent glitter
Glue runner and Ballpoint-tip Glue Pen
Scissors and craft knife
Clear embossing powder
(Links for the Clarity ingredients are below for you)

First place the stencil directly onto the blank greeting card and brush on the different greens to build your wreath

Next, with scissors (or craft knife) cut out the upper part of the card.  At first I just cut the front part  of the card as I was going to build a scene on the inside of the card above the wreath, but then decided it would be better to cut the front & back above the wreath, so fixed that!

Next cut the centre aperture out of the wreath on the front part of the card only.

Use the piece you've cut out as a template to cut the snowy acetate.  Remember to cut slightly larger so that you have enough of a border to run the glue tape round.  Stick the acetate in place inside behind the centre of the wreath.


On the open card, mask off the left-hand side with post-it notes and stamp the trees in first and second generation inks so that they are visible through the aperture when the card is closed.  (For those not familiar with the term -  second generation ink - ink up the stamp, blot on copy paper, then plot on your artwork, giving a paler image).
Add the moon mask and brush on the blues for the moody sky, gives a nice darker edge where the leaf shaped card has been cut too.
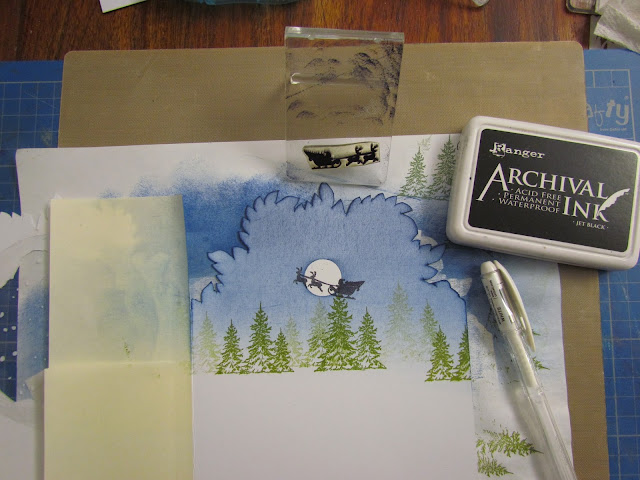
Stamp Santa flying to deliver the presents, again so that he is visible through the aperture, and use the white pen to highlight his sleigh.

Add some iridescent glitter to the trees and leave to dry.

Now on the front of the card, stamp the "Christmas Greetings" using Red Geranium Archival ink and clear emboss.
Stamp the holly using first & second generation dye based green ink.
I used some green Spectrum Noir colouring pencils to darken the wreath leaves and a grey to add a bit of shadow to both the wreath & greeting.
Using the Ballpoint-tip Glue Pen, dot on the berries and add red glitter to finish off.

There's another Christmas card made (and an idea for you for the challenge), but still lots more Xmas cards to make, so on my day off today, I guess I may well be doing some crafting!
So get your thinking caps on, and don't be shy, have a try.  You could be in the random selection draw at the end of the month to win a Claritystamp voucher to spend on some fab goodies. 
As the saying goes "You've got to be in it, to win it!"
There's lots of inspiration again this month from the other Design Team members too, so check out their blogs for lots of hints, tips and ideas.
Look forward to seeing your entries this month, and Good Luck to you x


Click on these useful links for ingredients above:
http://www.claritystamp.co.uk/Clarity-Stencils/16532-/Olive-Branch-Wreath-Stencil-7-x-7-Inch
http://www.claritystamp.co.uk/Clarity-Stencils/13450-/Clarity-Stencil-Brushes-Set-Of-4
http://www.claritystamp.co.uk/Information/Offers/17998-/Sprucescape-amp-Cabin---Unmounted-Clear-Stamp-Set
http://www.claritystamp.co.uk/Clear-Stamps/Christmas/18367-/Christmas-Miniatures-amp-Window-+-MASK---Unmounted-Clear-Stamp-Set
http://www.claritystamp.co.uk/Clear-Stamps/Christmas/5277-/Christmas-Greetings---Unmounted-Clear-Stamp
http://www.claritystamp.co.uk/Information/Search/17221-/Deck-The-Halls-amp-Holly---Unmounted-Clear-Stamp-Set


Sunday, 2 August 2015

Get into the "Groovi" with Claritystamp

Hi All
Barbara Gray is having a very "Groovi-week" on both her blog & the Claritystamp website from 1st to 7th August, so the Design Team are all joining in the fun to give you some inspirational ideas.
I thought it would be a good idea to make a card using a piece which was one of my first creations. 
Firstly let me tell you I am by no means a "parchment expert" and this was a "trial & error" piece as you'll see.  I've never, ever done parchment work before, but now I'm hooked as the Groovi system makes it so simple!
I had fun getting in the Groovi making my butterfly & flower design, then I thought, "I wonder what it would look like if I sprayed the reverse side of the parchment with Cosmic Shimmer Vintage Ink Spray Mist?"
Mmmmm, I found out it wasn't one of my best idea's as the parchment buckled when it got damp.......All was not lost though...........Look at the finished article!  Not too bad.....?


It started out as an 8" x 6" piece of parchment which comes with the Clarity Groovi Plate Starter Kit (on special offer at the moment http://www.claritystamp.co.uk/Groovi/18164-/Groovi-Plate-Starter-Kit)
 As it was a little wrinkly looking.........I cut it down from it's original size to 5" x 4" and just used the piece which had all the work on it.

I was much happier with that and now it looked far smoother and a lot flatter, but still a little crinkly (bit like me!). 
I added a few more flowers within the circle frame and coloured the butterfly and flowers in on the reverse using Spectrum Noir Colouring Pencils (http://www.claritystamp.co.uk/Accessories/Pens-and-Pencils/15679-/Spectrum-Noir-Professional-Colouring-Pencils---Floral)
I punched corners (the same as you would for photos) in a white piece of card and mounted the parchment securing it on the reverse at each corner using a small piece of Cellotape.
To finish the card, I mounted this on a piece of purple card slightly larger than the parchment, then mounted that onto a C5 scalloped white card, which I'd stamped around the edge with second generation ink using the foliage stamp from http://www.claritystamp.co.uk/Information/Search/15429-/Remountable-Boy-amp-Birds-Clear-Stamp---As-Seen-On-TV
Finally, I added a few little white hearts which were the innies from a punch I'd used for another project......And that's it folks - simples!


The Groovi system is a brilliant piece of kit for novices and experts alike - If I can do it, anyone can!  I also know that some of the parchment experts on the Design Team love this too, so go check it out.
You can find the Starter Kit and all the accompanying Groovi plates by following this link: http://www.claritystamp.co.uk - There's a fab freebie plate too at the moment if you spend over £40.....But hurry - you've only got until 7th August to get the beautiful freebie!!!
Happy Sunday everyone, whatever you may be up to xxx

Saturday, 1 August 2015

Claritystamp Challenge 30 - Bingo

Hello everyone - Hope you've had a great July, albeit that the weather has been a little "iffy" to say the least!  Let's hope August will be a bit warmer & sunnier for those who are having a staycation this year!
So for the August Clarity Challenge 30, we're having a crafty Bingo game by choosing what you'd like to use from the grid on the Challenge website.  So choose a line, diagonally, horizontally, or vertically, or the four corners, or if you're feeling adventurous, a full house using all the elements!
For my project I chose a horizontal line: Stencil, Stamp & Grunge Paste.....and for me it had to be a Christmas card!


Ingredients required:
7x7 Gelli card
Pine needle stencil
Stamps - Unmounted Christmas Banners and unmounted Baubles
Grunge Paste, palette knife & spreader
Clear Embossing powder
Ken Oliver Colour bursts
Inks: Distress - Mowed Lawn/Evergreen Bough/Pumice Stone
Archival - Fern Green/Red Geranium (on special offer this month at £3.98 on the Clarity website)/Coffee/Cobalt Blue
Cool Grey No. 5 Promarker
Coloured twine
Talc
Scissors
Tacky Glue & Glue tape runner
8 x 8 Blank greeting card
So firstly, tape down the stencil at the upper part of the Gelli card and spread the grunge paste across the top with the palette knife.   Using the spreader, drag the paste down from top to bottom through the stencil.  Have some water ready to clean the stencil, knife & spreader as it sets rock-hard if not cleaned off immediately!  Place the Gelli card to one side and leave to dry.....

While you're waiting, make your decorations.  I chose a variety of Christmas baubles, but ended up only using the small ones as I thought the large ones were a little too much for my card, but they'll come in handy for another project...never throw anything away!
I used a leftover piece of card from a Colour Burst session, dusted it with talc and stamped the banner and baubles onto it using the Archival inks, then dusted with clear embossing powder and heat set.

As long as the grunge paste is dry, replace the stencil over it and lightly spritz with water then VERY LIGHTLY puff the Ultramarine Blue & Pthalo Green Colour Bursts onto the dampened branches, then dab with kitchen roll. These little bottles of powder are very intense and you only need a small amount - They are such vibrant colours and great to work with.
Remove the stencil and leave your work to dry naturally.

Now back to your tree decorations & banner - cut them out.

From your chosen twine, make enough little bows for the top of each bauble

When the branches have dried, place the innies over the grunge paste and hold them in place while dusting with a clarity stencil brush & the Pumice Stone ink to colour in the background.  Remove the innies and to intensify the branch colours, I used Mowed Lawn & Evergreen Bough and a Clarity brush to lightly dust over them.  Under each branch, use the grey Promarker to add shadow.

Next mount your Gelli card onto a slightly larger contrasting piece of card using your choice of adhesive (I used my glue tape runner), then mount onto the 8x8 greeting card before hanging your baubles.
Stick on your greeting banner (I used the tape runner for this too), and decorate the branches with the baubles and bows (I thought that liquid glue works best on the grunge paste as it tends to be a bit uneven).
Et Voila!  Christmas card made..............

Don't want to worry you, but there's only 21 weekends left for shopping and crafting before Christmas!
Time to start making those lists for cards and gifts.......
Happy crafting (and Christmas shopping) all xxx


Wednesday, 1 July 2015

"Anything Goes" - Clarity Challenge No. 29

So here we are already with the July Clarity Challenge - the month's seem to be flying by! 
For you this time, I decided to do a canvas made with the Clarity Club stencil (from May I think).  (Just a little aside........The Clarity New Design Club has great benefits - as well as getting a stamp & stencil at the beginning of each month if you're a Gold Member, you get a 10% saving on all purchases and free postage on orders over £10 - I highly recommend it!)
Anyway, back to the challenge........"Anything Goes!".....so, here we go.........My finished artwork and how it came together........

Ingredients:
A4 canvas board
Powder watercolours of your choice - I used Ken Oliver Crafts Colour Burst (the little puffer bottles are fab for control) or you could use Brushos
Stencils - Fish (Club Stencil), Seaweed & Seaweed Frame, Jo's Bubbles & sequin waste
Grunge paste, Spreader & palette knife
Pirate Treasure Gilding flakes
Clarity Stencil Brushes, Blending Tool &  Brayer
Inks - Adirondack Stream & Eggplant, Tim Holtz Distress Inks - Mowed Lawn & Peacock Feathers,
Archival Ink - Fern Green, Archival Brilliance Moonlight White
Stamps - Tall Grass, Fish from the Harbour Set & grass from the Foxes Set
Fresco Finish Chalk Acrylics - Blueberry & Limelight
So first of all, spritz the canvas board with water and very lightly puff on some yellow powder and gently brush with a clean stencil brush

Next the blue - same process,,,,

Then finally the green

Next you need to compose your background with the seaweed stencils.  Place them around the canvas and using all the inks, gradually build the pattern through the stencils using the brushes.

That'll do!

Allow to dry completely, then attach the fish stencil where you would like him to be swimming in the deep ocean.  Spread some grunge paste on the side of the stencil with the palette knife.
 
Drag the grunge paste through the stencil with the spreader.  Immediately remove the stencil and place in water, together with the spreader & palette knife - be quick though as you then need to sprinkle the gilding flakes on while the grunge paste is still wet.  Once applied, VERY LIGHTLY press the flakes onto the grunge paste & pray for no drafts!.......
Ooooooo, looks a bit of a mess, but be patient and allow about an hour for it to dry completely........

Once dry, gently brush off the gilding flakes - not too hard as you don't want to remove them all!
Next - the border.....Take the Fresco Chalk paints and squeeze a small amount onto your crafting mat and brayer round the edge of the canvas, lightest colour first until you're happy with it.  I used the Limelight sides & top, and the Blueberry along the bottom.

Next, Jo's bubbles & the sequin waste.  Using the blending tool & Moonlight White Brilliance ink, dab through the stencils adding a few bubbles here & there.

Then stamp the grasses at the bottom of the ocean, which gives the picture depth, and also some little fishy friends - all using the Archival Fern Green ink.
And there you are - all done!

Hope you are inspired to create something for this month's challenge.  There's some fab inspirational pieces from the other Clarity Design Team members too, so please do check out all of their blogs as well.
As "Anything Goes" it doesn't have to be something new, how about looking around the house to see what you can up-cycle?......I've spotted quite a few things which could do with a make-over.....I just hope my other half Peter doesn't stand still for too long - he could end up covered in stamps & paint!!!
Don't forget there's a £50 Clarity Voucher up for grabs for someone picked at random, which means everyone's in with a chance, beginners & experts alike.  (Please check out the Clarity Challenge Blog for the rules).
Anyway, I look forward to seeing all your artwork....Happy crafting all, Carole xxx


Monday, 1 June 2015

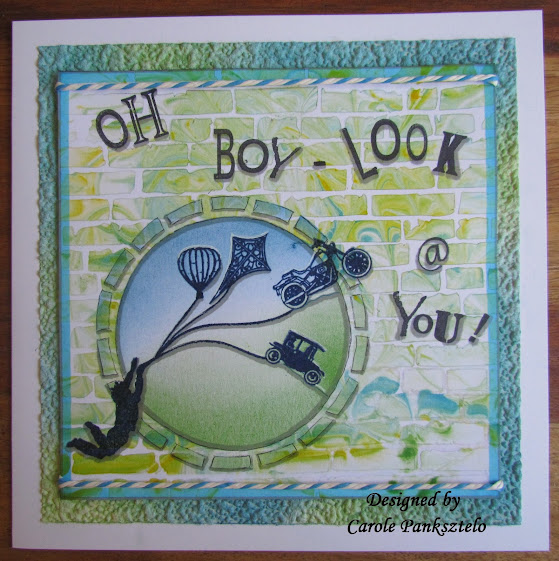
"Boys, Boys, Boys" - Clarity Challenge No. 28

Hi everyone.....
Well, the 1st of June already, and obviously a new Clarity Challenge for you all. 
I think we all know how challenging (excuse the pun) masculine cards can be, but hopefully you all have enough stamps and stencils to make this one a breeze....so here we go for the Boys.......


For my card, I used the following ingredients:


8 x 8 blank greeting card & a piece of 7 x 7 Gelli card
Shaving foam - the cheaper, the better, Perspex box lid, Spreading Tool and a skewer or fork
Tim Holtz Re-inkers - Broken China, Mustard Seed & Mowed Lawn
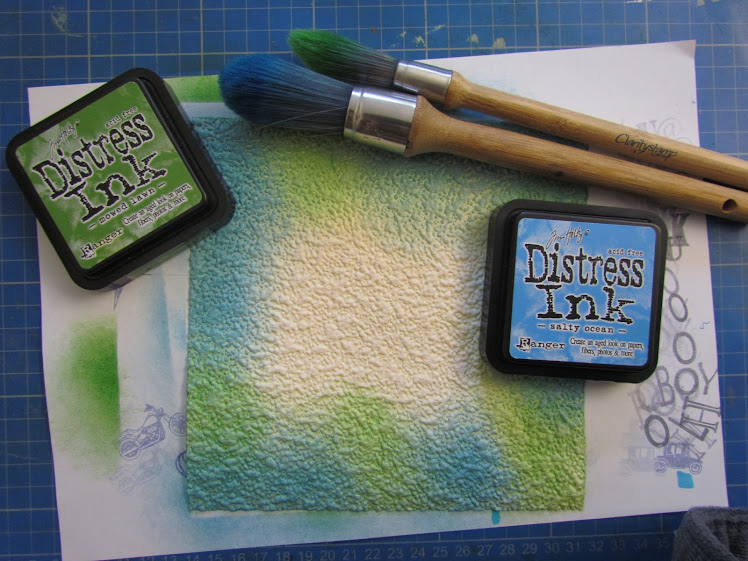
Also Salty Ocean & Mowed Grass Distress Ink pads
Ranger Archival inks Black & Cobalt
Brick Wall & California Stencils
Stamps - Boy & Birds & various small ones from Victorian Miniatures (the car & motorbike), Wrought Iron Dolls House, Small Hot Air Balloon & various Word Chain words masked off to create my "Oh Boy - Look @ You!"
Clarity Stencil Brushes
Cyan Promarker & Sharpie pen
Textured wallpaper scrap, (courtesy of Wicks)
First & foremost, make a cuppa, we could be here for some time.......!

Spray the shaving foam into the plastic lid big enough to take the 7x7 piece of card and spread so that it was fairly flat. I then randomly dripped in the inks and whirled a wooden skewer through it to mix the colours up a little.

(Now I know from experience that the first dunk is quite bright, so I thought I would take another piece of card to use at a later date - I'll show you further on the two examples side-by-side to give you an idea).
Fix the circular part of the California stencil far enough in so that the Boy & Birds will fit to the lower left of the card, and place the Brick Wall Stencil over the top and tape it down tight to stop it moving.  Place the piece of Gelli card stencil-side-down into the shaving foam and press evenly.  Gently lift out and place direct onto the craft mat to scrape the excess foam off using the Spreading Tool.  Once done, wipe your work with a piece of clean kitchen roll.

Here's the first & second dunks so that you can see the difference

Wait for this to dry completely before starting to stamp onto the card.
Dust with talc as the next part is to emboss the main image.  Mask off the birds then ink up the Boy & Birds using the Cobalt Archival ink - don't forget to remove the masking tape before stamping!
 
Emboss with clear powder and heat-set.  Next stamp the miniature stamps on the end of each string and emboss in the same way.  I chose words from the Word Chains that contained letters to make up the sentiment, then laid them onto the artwork to see what best fitted with the design. I masked off and stamped accordingly as shown, in Black Archival ink.

Next I took the outer part of the Californian stencil and taped it over the circular area to brush through with Salty Ocean and Mowed Grass inks

Once done, I removed the masks, added shadow to the whole piece, then outlined it with a Cyan Promarker and put some contrasting twine across the top & bottom, cellotaped on the underside.

Finally - we all like a freebie don't we?  Last time I went to the DIY store, I decided to look at the wallpapers and thought that the heavy duty anaglypta was perfect for using as backing paper as you can colour co-ordinate to suit your project.  Probably not everyone's cup of tea, but I like it.  Cut to size and brush randomly with the Distress Inks.

Mount the anaglypta on the base card, put mounting foam pads on the artwork (as it won't lay flat due to the twine attached on the underside), and mount.
Well, that's about it folks - the finished article.....and I hope you enjoyed your cuppa too!

Hopefully you'll find this, and the other DT blogs inspiring, and I look forward to viewing and commenting on your creations over the coming month.


Go on then, get your thinking caps on......Happy crafting folks! xxx


Friday, 1 May 2015

Clarity Challenge 27 - "Clocks"

Hi everyone
Welcome to May and the new Clarity Stamp Challenge 27 which is "Clocks"........So here we go with my take on this month's theme.
 
 It took a while for this to all come together, but I hope you like it and find it inspirational!
Ingredients:
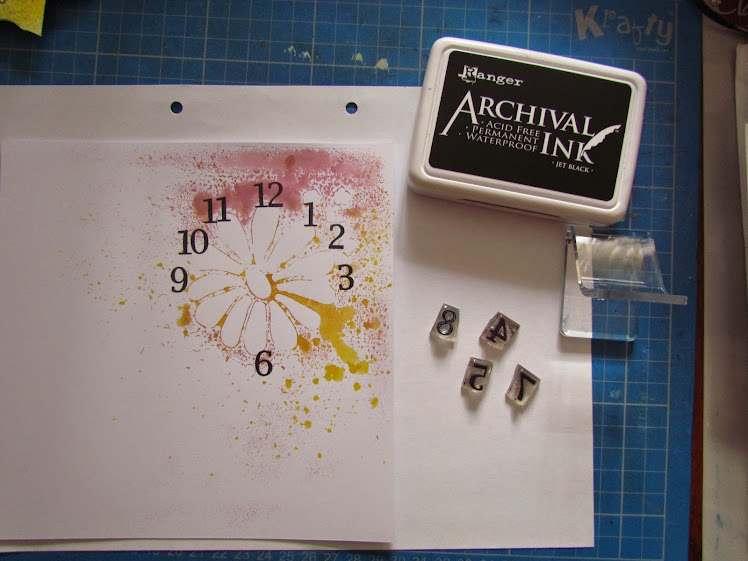
A Gelli-plate clean up using the Flower Power Stencil (inks used were Tim Holtz Mustard Seed re-inker in a spritz bottle and Clover Cosmic Shimmer Vintage Ink Spray Mist)
Re-mountable numbers & Woodpress letter kits
Medium & small Lamp post clear stamps
Lone Cypress Framer Stencil
Any Clarity framer stamp with an "O" in it (I used "Joy" for this project)
Cyclist from the Re-mountable Sport Set
Archival Black, Butterscotch Adirondack, Tim Holtz Peacock Feathers & Victorian Velvet
Talc & Clear embossing powder
Fresco Finish "Zesty Zing" acrylic paint, brayer & blending mat
Post-its
Clarity Stencil Brushes
Contrasting Spectrum Noir Colouring Pencils
Black Sharpie Pen
Pro-marker Grey shade 4

First stamp the 12 & 6 top & bottom of the flower, then the 3 & 9 for the quarter hours, then equally space out the rest of the numbers around the daisy.

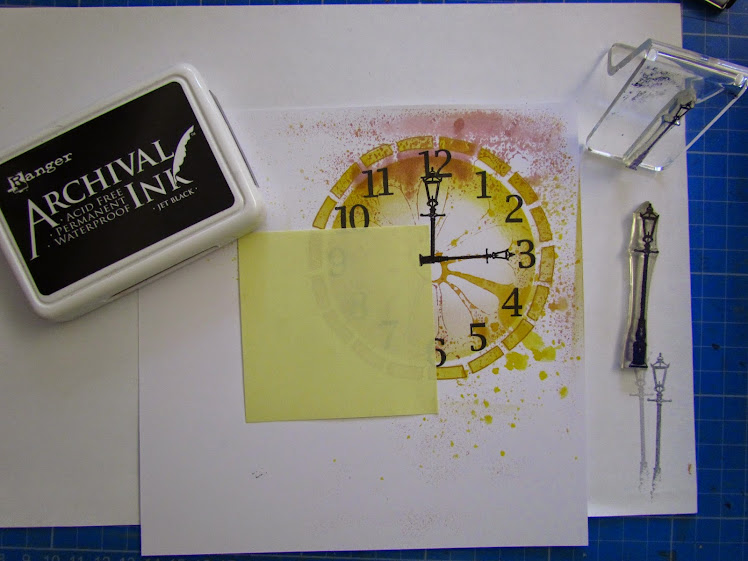
Place the Lone Cypress Framer Stencil over the flower and using a Clarity brush and Mustard Seed distress ink, use circular movements around the edge to highlight.  Remove the stencil and mark the middle of your clock to position the hands, (or in this case, the lamp posts!)

Stamp the lamp posts using a Post-it to ensure the base doesn't extend further than the centre.

Dust the card with talc then ink up the Joy (or any other) Framer, mask off the spare letters and stamp just the "O" under the clock and emboss with clear powder.

Now stamp and emboss the rest of the word

Bring on the Blending Mat, Brayer & Zesty Zing Fresco Paint - brayer lightly around the edges.  Stamp the rest of the words and your racer, embossing as you go.
Next cut out a mask for the "O" and use the outie so that you can add some scenery behind the cyclist.
With the Sharpie pen draw a double line around the edge of the card to frame it and colour in random blocks as shown.
Except for the clock face, using Peacock Feathers, Butterscotch & Victorian Velvet inks, brush around sections of the card to fill in the whiter parts, then colour the daisy clock with yellow Spectrum Noirs.
Add some "Tick-Tock" words with the Sharpie pen and draw the same pattern on the inside edge of the "O". 
Finally add some shadow using a grey Pro-Marker and mount on an 8x8 greeting card.
Hope you like the finished artwork, but I must just say when I started out I didn't imagine that a daisy clock and a cyclist would end up on the same card, but artist licence allows these sort of things to evolve! 
Whatever you decide to have a go at, (be it crafting or otherwise), stick with it - things often turn out better than expected!
Happy crafting and good luck wherever your imagination takes you with Challenge 27.......I look forward to seeing all your creations.  Crafty hugs to all, Carole P xxx