Sunday, 22 March 2015

Gelli-plate meets Cellotape!

Hi everyone....
Well yesterday, Peter was out golfing, so I sat and watched some tutorials on YouTube about Gelli-Art and discovered the "Gelli plate & packaging tape" method and I must say I'm very pleased with the results I got today.  The photos don't really do the end result justice, so if you fancy having a go, I can highly recommend it so that you can see for yourself....BUT....you have to have lots of patience for the drying time if you use open acrylics like I did for the base colours! Here we go.......


Using a clarity brush & the open acrylics, brush them randomly and blend them on the Clarity mat & lay the Gelli plate onto it, leaving one of the Perspex sheets  on the top of it as you need to lay it down after pulling off the mat.

Pull the Gelli plate from the Clarity mat and lay Perspex-side down......then the fun starts.......

Brayer white acrylic paint onto your Clarity blending mat and dip anything you like the shape of into the wet paint...be quick though before it dries! For interest, I did the same with some gold acrylic too (did you notice I forgot to put the gold acrylic & flower stamp in the photo's?). 
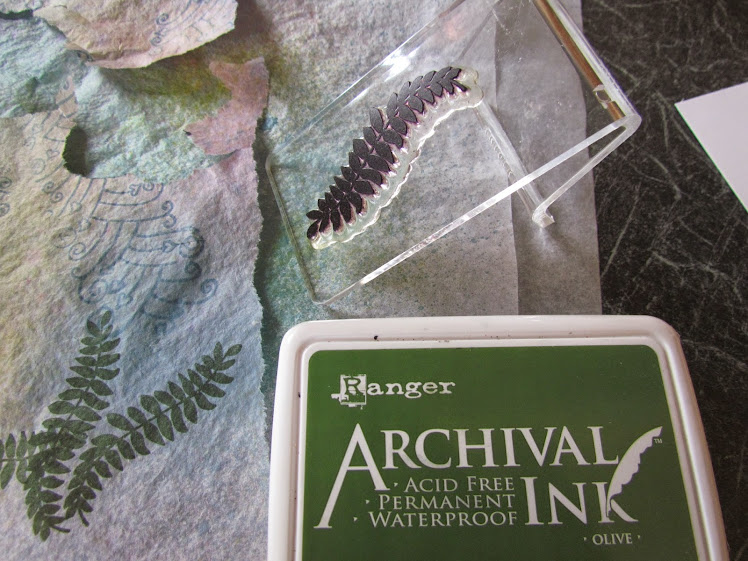
Archival ink works well on this too, once the acrylics dry, you can stamp anything onto it with no transfer of the acrylic paint, so I used Ranger Olive Archival ink for the leaves.

Lay the wide Cellotape onto the Gelli-plate and press down well so that you can remove all the paint on each strip, (this would work well with the wide or narrow Cellotape).  Make sure that you use a craft mat under the Gelli-plate when you do this - don't put paper under the Gelli-plate as the ends of the tape will stick to it and you need these free to peel the tape off.

Peel off and lay sticky-side-up onto a piece of copy paper.......Bring on the Gilding Flakes and Perfect Pearls - wherever there's any sticky tape still exposed, choose where to put the Gilding Flakes and brush the remaining sticky areas with various contrasting Perfect Pearls.

Add a bit of Stampendous Fran-tage Silver Crushed Glass Glitter - make sure you press it flat though as you don't want any edges poking through the Cellotape!

I stuck the tape onto an old book page, but then decided it was wasted on there so I took it off.........

Looks much better stuck onto white card - to do this I used a glue tape runner across the card then stuck the tape to it - great borders!


Next projects will be to use these me thinks!
Have fun!!
Crafty love to all xxx

Sunday, 1 March 2015

Claritystamp Challenge 25 - "Anything but a Card"


Well I wasn't sure what to do and had so many ideas going round in my head, so I tried to keep an open mind and went out and bought lots of "stuff" which I kept thinking "oooo - that'll be nice decorated."  So now, I have lots of projects that I'll work on over the coming weeks.....
So for this month's challenge, I decided to go with a glass lantern (bought very reasonably priced in Poundland.....& guess how much it cost????).


Here's the finished item......

And here's the ingredients:
Poundland glass lantern
White tissue paper
Claritystamp "Remountable Hares" and the "Heart weave" stamps
Cornflower Blue, Black & Olive Ranger Archival ink pads
Cosmic Shimmer Vintage Ink Spray Mist - Evergreen, Purple Orchid, Arctic Blue & Clover
Tim Holtz Distress Re-Inker - Mustard Seed (small amount decanted and mixed with a tiny amount of water in a spritz bottle)
Martha Stewart (or similar) Decoupage Glue & Sealer
Large soft brush for applying the decoupage glue
Small paintbrush


Lay the tissue paper out on a sheet of plastic to protect your surface and spray the inks randomly as you like, then stamp the heart weave using the Cornflower Blue archival ink.


(You may notice that a bit of yellow has crept in  - I thought this needed a bit more of the rainbow so I spritz some watered down Mustard Seed Distress Ink on the tissue paper as well). 
Tear the tissue into manageable sized pieces.  Coat the jar all over with the decoupage glue and allow to dry. 

Pick up the jar by placing your hand in it, this helps when applying the glue so that you don't get glue all over your fingers.  Paste a thin layer of glue where you want to place your first piece of tissue and gently press the tissue onto the jar with the glue brush and add a little more glue over the top to seal it.  Be careful not to brush too hard - if the tissue tears, you can place another piece on top, that's the glory of decoupage, but you don't want too many layers of tissue or the glass won't be as opaque. Continue to add the torn tissue in the same way until the whole jar has been covered with the first layer.


Stamp the hares onto the tissue and tear them out close to the outline, then use a wet paintbrush to remove the excess tissue as close as you please to the hare's image. 

Use the same technique for the fern leaves

Next, decide where you want your images on the jar and repeat the glue and stick technique around the jar until you have completed your little scene.  Once you've finished sticking all your images on, gently paint a thin coat of glue over the whole thing to seal it and hang it up somewhere to dry completely.


So there you have it - A pretty inexpensive way of lighting the garden in the summer evenings, or a sweet gift to give.


Have fun with your Clarity stamps - the possibilities are endless....I'm thinking the "Wee Folk" would look great on these bargain jars!
Enjoy designing your "Anything's" and I look forward to seeing your creations!
Send crafty love to everyone xxx

Sunday, 1 February 2015

Clarity Stamp Challenge 24 - "Floral"


Well folks - a new month and a new challenge for all you Clarity crafters out there!
I decided to showcase Clarity stamp "stamps" as my inspirational piece this month.
These stamp-stamps have endless possibilities, but for me this month, the floral theme is the way to go.
To start with, gather together the large 1st Class stamp, the oblong 1st Class and the triangular one, together with the archival black ink pad, the letter box kit, and some masks cut from post-its


Make a collage of stamps arranging as you wish on an 7x7 piece of gelli-plate card, randomly stamping the oblong & triangular stamps in the centre, masking as you go.
Stamp the large 1st Class stamp in the middle at the top and arrange the letter boxes to spell out "Clarity" at the top & "stamps" at the bottom, then stamp the letters in place.  Mask off the boxes and large 1st Class stamp to add shading round them. 
Gradually stamp floral images into each stamp aperture, making sure you mask around each one to prevent the image over-stamping onto the others.  Once they all have an image, mask them all off and gently add shadow using Black Soot Distress Ink on a makeup sponge.  Then stamp the leafy branch around the edge with Mowed Lawn Distress Ink before removing the masks.


Colour in the stamps using Spectrum Noir Colouring Pencils


Mask off the large 1st Class stamp and use the floral border to add detail around the inner edge.


Using a selection of Spectrum Noirs, colour in the boxes.  Then using  the blending tools add Salty Ocean and Mowed Lawn Distress Inks, alternating the colours round the edge of the card - (apologies about the side-ways image - as this is all a bit new I can't see where to rotate the photo!)  Anyway - you'll get the idea if you tilt your head to the right.........


Finally, mount on a blank greeting card, and you're all done!


Good luck with your entries - I look forward to seeing them all xxx


Saturday, 3 January 2015

"Wonderful Family Forever" - Thank you


We had a brilliant time over Christmas with my partner Peter's sister Jan, her hubby Phil and their daughter Ellie (affectionately known to us as Els :-))......So for them, a little thank you card for their hospitality, great fun & laughter - which is what I believe Christmas-time and family get-togethers are all about!


I'm a bit better prepared this time to blog and have taken a few more photos along the way, although normally I must say I wing-it as I go along when I'm card making, deciding what to add at each stage as I progress with my artwork, so I'm trying to be a bit more organized for you :-)

So for this card I used

The sentiments from the Clarity Word Chains & the Foxes fitted perfectly as we are thanking the Townsend family Jan, Phil & Els (three foxy people).
I used the inks as shown & the 7x7 base Gelli card was made a while ago by spritzing the leftover inks on the Clarity blending mat, laying the bubble stencil on it, then pressing the stencil onto the Gelli card.
Stamp the words and foxes in place using the Black Archival ink, re-stamp over the words slightly off-setting with the Salty Ocean for the shadow effect

When you've stamped the main piece, start to build the scene by tearing a piece of paper and use the blending tool with Mowed Lawn Distress ink to make the landscape. 
Once done, cover up each level of the hills and stamp in the trees, ink-blot-plot some to give the effect of them being in the distance.  Stamp the first generation ink trees at the lower levels so they are in the front.  Ground the foxes too by covering them and using the blending tool to sit them on the grass. Place a moon mask and sweep across the sky with a Clarity stencil brush using the Peacock & Salty Ocean Distress inks.
Use the foliage stamp from the Clarity Remountable Foxes Clear Stamp Set & the Leaf stamp from the Remountable Hares Stamp Set to add some greenery - use the Archival Olive Green & Adirondack Juniper, ink-blot-plot some, and use first generation ink for others in the foreground.

Now colour in the Foxes using Spectrum Noir Colouring Pencils (Hurry - still on special offer from Clarity Stamps - set of 5 for the price of 4), I used the Nature Set for my project.  I also used the green shades lightly over the trees & grass area, as some parts were a little too white.

Add some white highlights to the foxes faces and tail-tips.  Underline them, and the words, with a  Grey Shade 4 Promarker.  Draw double wiggly lines with a Black Micron Pen quite close together around edge of the top half of your artwork and colour in with contrasting shades.  Either side of the black lines, follow round closely with a silver pen.  To finish off, mount your work on an 8x8 card and stamp the Clarity Remountable Million Thank Yous Clear Stamp inside and use the same set of pencils to colour in.  You're all done, so...........

Have a great day everyone xxx


Friday, 2 January 2015

Clarity Challenge 23 - "Things with Wings"

This is all very new and exciting and I'm so chuffed to now be part of the Clarity Challenge Design Team. 


For Challenge 23 "Things with Wings", Pegasus immediately sprung to mind!


I looked through my vast array of  Clarity stamps and stencils and knew that the following would make the perfect mythical creature


Wooden Horse clear stamp
Large Blue Tit clear stamp (just one wing)
"Magical" from Word Chain set 7 clear stamps
The Clockwork stencil


Clarity stencil brushes, blending tool & make-up sponge
Black Micron pen
Silver pen
White pen
Few small silver stars
Ribbon & embellishment


I love blues & purples, so to get the effect, I used Eggplant & Raspberry Adirondacks & Salty Ocean Distress Inks through the stencil, and a selection of blue & purple Spectrum Noir pencils to colour Pegasus.  Then I used Weathered Wood Distress Ink & Grey (Shade 4) Promarker for the shadowing.


So for the design, mask off the edges of a 7x7 gelli plate piece of card the width of the tape so that the line will be equal all round, then stamp the wooden horse in Black Archival Ink in the centre & mask him off, then ink up one wing of the large Blue Tit and stamp into position.  Mask this off too so that the whole stamped image is covered.


Attach the stencil with masking tape and start to brush the Salty Ocean ink around & around the edge of the stencil with the Clarity stencil brush, gradually bringing in the colour to the centre.  Darken around the edges using the blending tool with Eggplant, then brush over the Raspberry to give a purple effect around the cogs. 


Once done, remove the stencil and lightly use a make-up sponge around Pegasus to give a bit of depth before un-masking him.  Now go ahead and make him pretty with the Spectrum Noir pencils  (I love my new pencils which were part of my Christmas prezzies this year and can highly recommend them - on special offer at the moment from Clarity!)  Clad his hooves with the silver pen and outline around his upper lines with the white pen, then under him with the grey Promarker.  Remove the masking tape from around the edges of the card and draw free-hand around each side of the clockwork square with the Micron pen.  Stamp "Magical" in Black Archival ink, then re-ink the stamp again with the Salty Ocean and stamp over the top, slightly off-setting it to create an echo of colour - underline the lower part of the letters with the grey Promarker for shadow.


 Use the blending tool loaded with a small amount of Eggplant around the 7x7 card edges.


Attach the ribbon, embellishment and jazz it up with a few twinkling stars and attach to a blank greeting card - you're all done!


Thank you for joining me on my first blog and I look forward to sharing more ideas with you over the coming months.


Happy crafting everyone! xxx