Sunday, 14 February 2016

Love themed Clarity Challenge


Well here we are again for the second posting for this month's "Love" Challenge.....
I hope you like it....


Take the following ingredients:
Clarity Vine Heart Stencil
Copy paper
3 pieces of Clarity 7x7 Stencil card
Cosmic Shimmer Vintage Ink Spray - Evergreen
Perfect Pearls Mists - Interference Red


Lay the stencil onto the copy paper and spritz the two inks onto it - this mix of colours gives a lovely verdigris-effect
Spritz the inked stencil lightly with water then carefully pick it up (try to avoid touching the ink) & turn the stencil over onto a piece of the Stencil card
Next work on outlining and shadowing the heart & vines with a Micron pen and a grey Promarker

Take another piece of stencil card and make the background by spritzing the same green & red onto one piece

I sprayed a little too much ink onto the card, so I laid another piece on top and transferred the excess ink to the second piece - it's always nice to have a choice!
I decided to cut around the heart leaving about 1/4 inch border of white, as I wanted more of the background to show.  The nature coloured Spectrum Noir pencils enhanced the already pretty colours on the heart perfectly.

Once the background card is dry, dust it with talc and using "Love" from the Wordchain set 6, stamp randomly with the Versamark ink and white emboss. 

Using a ruler and a contrasting coloured Promarker, edge the stencil card and then draw a thin black line with the Micron pen.
Mount the background card onto an 8x8 blank greeting card, then mount the cut-out heart piece at an angle using double-sided tape.....That's it - finito!!

Here's a few photos to try and show how 3-D it looks - I like this effect.


You've still got time to enter the February Challenge you know - the winner is randomly selected, so everyone's in with a chance of winning the top prize of a £50 Clarity voucher....
You've got to be in it to win it! 
Good luck and see you again soon xxx


Monday, 1 February 2016

February Clarity Challenge No. 36 - "Love"

Hi there - February's Clarity Challenge is upon us already!  The "Love" theme should be a great one to air all things love-related from Clarity - there's certainly lots to choose from!
So down to business.....a romantic one for all you lovers (& crafters) out there! 
             
My ingredients are:
Best Ever Craft Mat (Mine is on order as we speak - looked fab on Paul's HOCHANDA show)
Blank 8x8 base greeting card
Clarity Stencil Card x 2 (& any small scrap card for mopping up stray-spray)
Water Spritzer Bottle & low tack masking tape
New Design Club - 7x7 Heart Stencil
New Design Club - Elephant Heart
"Celebrate" from Word Chain 3
Wee Folk 6 Wedding - The wee entwined hearts
Cosmic Shimmer Ink Spray Mist "Clover"
Perfect Pearls Mists "Perfect Copper"
Spectrum Noir "Essentials" colouring pencils
Black Archival Ink & Tim Holtz "Victorian Velvet" & "Mowed Lawn" Distress Inks
Medium Charcoal Pencil
Black Micron Pen, Pink & Grey Promarker, Bronze Uni-Ball Pen
Blending Tool
(See links below to the Clarity website to help you find products available direct from Claritystamp)
I've been trying to use some of my "older" Clarity products rather than using the "on-trend" ones, so I chose a pretty NDC Heart Stencil and attached it with low tack masking tape to spritz my chosen pink & copper colours through it.
I hate wasting ink - when I removed the stencil, there was quite a lot of ink on it, so I lightly spritz it with water and placed it ink-side-down onto a second piece of stencil card - when removed, this gives you the negative image. 
There was quite a bit of stray ink on the craft mat too, so rather than just wipe it up, I dabbed a piece of scrap card  onto it. 
There you go, a nice background card for a future project - "Waste-not, want-not" as the saying goes!  Next, stamp the NDC Elephant Heart using Black Archival into one of the stencilled hearts....that's the glory of "all-things-Clarity", they're so inter-changeable! 
Colour in the headdresses of the elephants with Spectrum Noir pencils and using the copper pen, fill in-between the lines of both elephants, and add a few dots around the headdresses. 
Add a charcoal shadow under them by lightly drawing a thin line with the charcoal pencil and blend downwards with your finger - Darken as necessary.

Stamp "Celebrate" in Victorian Velvet ink and outline with the Micron pen.  Then also stamp a few Wee Hearts in pink.  Draw round the stencil heart twice and fill in using a chequered effect with the black pen and add some colour to the leaves using a green colouring pencil.
To finish off, I drew random sketchy lines around the square outline with the black pen, then did the same with the pink Promarker.  Underline  the lower part of the large & small hearts and the word with the grey Promarker for shadow.  Using a ruler and the pink Promarker edge the stencil card with a thin line, then add some twine and a bow to the stencil card. 
Using the blending tool, take your base card and lightly add some Meadow Grass green ink around the edge.  Mount the finished artwork on the base card & that's it completed.
So this is my first February inspiration for you.  I hope you have some fab ideas for this month's Challenge, but if you're struggling a little, check out the rest of the Design Team samples.  You can click on the link in the Clarity Challenge Blog to see how to create all the other samples.  For next time I will re-set the links to my Team mates on here again, as they all seem to have disappeared!
The Team will be adding some mid-month examples too, so feel free to re-visit us any time.
Look forward to seeing all your entries.  Although it makes our task more challenging to choose the Top 5 when there are loads of entries, it's wonderful to see all your artwork.  Let's see if you can beat last month's bumper amount of entries....Spread the Clarity Challenge word!
Happy Valentine's Day for the 14th - Have a fun time with your loved ones. 
Thanks for visiting me today, and I hope to see you back again soon xxx 
http://www.claritystamp.co.uk/Information/Search/19138-/Best-Ever-Craft-Mat
http://www.claritystamp.co.uk/Mounts-and-Card/17043-/Stencil-Card---7-x-7-Inch-x-50-UK-amp-EU-only
http://www.claritystamp.co.uk/Accessories/Crafting-Tools/16010-/Spritzer-Bottles---Pack-of-5
http://www.claritystamp.co.uk/Accessories/Adhesive/4370-/Stix2-Low-Tack-Masking-Tape
http://www.claritystamp.co.uk/Stencils/15221-/NDC-Heart-Rose-Stencil-7-x-7-Inch
http://www.claritystamp.co.uk/Clear-Stamps/Animals/18601-/Elephant-Heart---Unmounted-Clear-Stamp
http://www.claritystamp.co.uk/Information/Search/15304-/Word-Chain-3---Unmounted-Clear-Stamp-Set
http://www.claritystamp.co.uk/Information/Search/18041-/Wee-Folk-6-Wedding---Unmounted-Clear-Stamp-Set
http://www.claritystamp.co.uk/Ink-Pads/Distress-Ink-Pads/6677-/Distress-Pad---Victorian-Velvet
http://www.claritystamp.co.uk/Ink-Pads/Distress-Ink-Pads/16639-/Distress-Pad---Mowed-Lawn
http://www.claritystamp.co.uk/Accessories/Pens-and-Pencils/16234-/Charcoal-Pencils-Set-of-6
http://www.claritystamp.co.uk/Accessories/Pens-and-Pencils/4006-/Pigma-Micron-01-Black-Fine-Point-Pen
http://www.claritystamp.co.uk/Accessories/Pens-and-Pencils/5738-/Promarker-Summer-Set
http://www.claritystamp.co.uk/Information/Search/16977-/Mini-Ink-Blending-Tool-amp-Foam-Pack


Friday, 1 January 2016

Challenge 35 - "Say it with Flowers"

Happy New Year everyone! 


Hope you had a wonderful Christmas with family & friends....and now on with 2016 which I hope brings lots of great things your way!!


For my inspirational piece this month, I wanted to use a canvas board, so chose a square 8x8 board and got out all my flowery Clarity stencils.  I also wanted to use the fab clear texture paste & glass beads that Barbara introduced us to last year.  I used these on a card and I can highly recommend them if you're looking for something to enhance your artwork, they're beautiful when they glisten.


So here's my step-by-step:
Ingredients (most can be found on the Claritystamp website and I've added some links to make life a little easier for you at the end of this blog):
8x8 canvas board
Flowers Stencil & low tack masking tape
Clarity Brushes & make-up sponges
Distress Inks: Tumbled Glass, Evergreen Bough, Squeezed Lemonade, Shaded Lilac, Spun Sugar & Weathered Wood
Adirondack Inks: Peach Bellini, Salmon
Pebeo Patinating Wax (Gold)
Cosmic Shimmer Clear Texture Paste & Spreader
Clear Glass Micro Beads
Cosmic Shimmer Vintage Ink Spray Mist - Arctic Blue & Evergreen
Perfect Pearls Shimmer - Pearl White


Attach the stencil so that the corners are mid way along each edge (it measure approximately 7.5 cms from board corner to mid-point where the stencil edge is).
Next brush & sponge the pastel colours onto the flowers
Then fill in the gaps with the Weathered Wood Distress Ink - gently dab to keep the pastel feel to the artwork.  Then sponge a very small amount of the Pebeo Patinating Wax around the frame within the Flower Stencil - I find it easier to squeeze a small amount of the wax onto the craft mat and gently dab the sponge into it to get the required amount.
Now drag the clear texture paste through the stencil. 
Remove the stencil straight away, and carefully place the canvas with the wet paste into something with a rim to catch all the wayward teeny glass beads as you sprinkle them on.....WARNING - they roll everywhere!  Then patiently wait for your work to dry...............
Once dry, tap the back of the canvas over the lid with the beads in as there will be some lose ones once the paste has dried.
Here's a close-up.....

(If I'm honest, I think the flowers would have looked better outlined or Zentangled before the clear paste was applied.  I really wanted it to look like a stained glass window, but have run out of time to re-do it as I need to pack to go on holiday!  I will re-do another canvas with a bit of outline & tangle when I'm back,and add photo's to my blog later in the month  - Watch this space for a revised version!).

Finally, cover the window in the middle, and spritz the white canvas corners with Perfect Pearls and Vintage Ink Spray Mists.  Once dry, turn over and attach some string to hang the artwork.
That's it for now - Please do pop back towards the end of January and I'll have another version of this piece of artwork posted for your perusal. 
 
I look forward to seeing all your interpretations of this month's theme using any of the Clarity products. (Please check the Claritystamp website for the competition rules).

Why not tell your friends too - they may want to have a go at bagging themselves a £50 Clarity Voucher!  Everyone's in with a chance as it's a random selection process and everyone's welcome to enter, beginners & experts alike!

Do pop along to the other Design Team Members Blogs as well for more inspirational ideas and Good Luck in the first Challenge of 2016!


Again, Happy New Year one and all - Have a fun year ahead with lots of laughter & happiness...and of course crafting!
 
Thank you for visiting today and I'll see you back here soon,
Love & hugs, Carole xxx


And here's Version 2 - with the line-art


Useful links:
http://www.claritystamp.co.uk/Stencils/14657-/Flowers-Stencil-7-x-7-Inch
http://www.claritystamp.co.uk/Stencils/13450-/Clarity-Stencil-Brushes-Set-Of-4
http://www.claritystamp.co.uk/Accessories/Miscellaneous-Goodies/19078-/Cosmic-Shimmer-Texture-Paste-Clear 
http://www.claritystamp.co.uk/Information/Search/15984-/Spreading-Tool
http://www.claritystamp.co.uk/Accessories/Miscellaneous-Goodies/19079-/Clear-Glass-Micro-Beads

Sunday, 1 November 2015

Clarity Challenge 33 - Clean & Simple

Hi All
Here we are for the 11th Clarity Challenge this year and we're going "Clean & Simple" this month.  It's a bit more difficult than you think, to try and be minimalistic when crafting - I think for most of us crafters it is a challenge that's for sure!
I thought I'd use the Angelina Fibres on my project - the colours are really pretty and once heat is applied to them, they're even better.

So the ingredients:
6x6 Stencil Card
8x8 Blank Greeting Card
7x7 Clarity MegaMount
Angelina Fibres
Iron (craft or domestic)
Baking parchment
Word Chain No.s 7 & 13
Black Archival Ink
Embossing Tool or pointed implement like a skewer
Glue runner
Paperartsy Acrylics - Limelight & Hyde Park
Brayer
Gold Pebeo Patinating Wax
Mount the "Magical Christmas" onto the Clarity Megamount and tease-out some of the Angelina Fibres to a piece large enough to cover the words - make sure it's the right shape before you ink up your stamp.

I don't have a crafting iron, but a domestic iron works just as well.  Make sure the iron is empty of water and heat it on the silk setting.
Ink up the words with Black Archival, place the Angelina Fibres over the words, then lay the parchment carefully on top.  With the pre-heated iron, gently press the parchment for a few seconds - I pressed for a few seconds, then lifted the iron to check.  It only takes a matter of seconds to heat-set, so it's better to do it a little at a time and check your progress by peeking under the iron as you go as you don't want to over-cook it.

Next I teezed out some of the fibres round the edge using the No. 1 Embossing Tool so that it looked a bit fluffy round the edges. (Hold the words tightly as you don't want the fibres pulling from the centre).
As I didn't want the fluffy edges stuck to the card, I used the glue runner and just ran a couple of lines across the middle to hold the fibres in place.
Next, I brayered some Paperartsy Acrylics round the edge.
 
I then stamped a couple of fairies straight onto some fibre that I had ironed between two sheets of parchment, and cut them out.
I thought Limelight was a bit bright on it's own so I called on the help of Hyde Park & Pebeo Wax to tone it down a bit.


So that's it for another month, but before I go......just thought I'd quickly mention the Angelina Fibres.
They're one of those things that are quite difficult to photograph, but they produce some lovely colours, especially if you separate the strands from each colour and mix them together - very pretty

This is all the colours ironed between baking parchment.

Anyway, had better close now as I've got lots to do for my card sale on 5th November.
Have a wonderful Sunday everyone xxx


PS Here's some links to the Clarity goodies I used this month if you want to take a peek
http://www.claritystamp.co.uk/Accessories/Fresco-Finish-Acrylic-Paints/17870-/Fresco-Finish-Acrylic-Paint---Limelight---Translucent
http://www.claritystamp.co.uk/Accessories/Fresco-Finish-Acrylic-Paints/17865-/Fresco-Finish-Acrylic-Paint---Hyde-Park---Semi-Opaque
http://www.claritystamp.co.uk/Clear-Stamps/Angels-Fairies-and-Elves/17735-/Wee-Folk-3-Fairies---Unmounted-Clear-Stamp-Set
http://www.claritystamp.co.uk/Information/Search/15456-/Word-Chain-7---Unmounted-Clear-Stamp-Set
http://www.claritystamp.co.uk/Information/Search/18401-/Word-Chain-13---Unmounted-Clear-Stamp-Set
http://www.claritystamp.co.uk/Accessories/Angelina-Film-And-Fibre/18325-/Angelina-Fibres-Kit-+-Mega-Mount-5-x-5-Inch

Thursday, 1 October 2015

Clarity Challenge 32 - "Stencils"

Hi everyone - nice to see you back again!  Hope you've all been enjoying the sunny days we've had over the last few weeks? 
For October, our Clarity challenge is giving the Design Team a chance to showcase some fab Stencils to give you some inspiration, and there's some very different ideas from some of my team mates, so there's plenty of choice, and so many possibilities......
For my design this month I've used one of the newer stencils "Circles Box Frame", and to accompany it, the fab "Grace" from the "Elegance & Grace" ballerina set as seen on HOCHANDA last Sunday - Hope you caught the shows!

Ingredients:
8x8 blank greeting card & a piece of A5 Chromo card
Adirondack Inks: Eggplant, Stonewashed
Black Archival Ink
Distress Inks: Black Soot, Broken China, Worn Lipstick
Cling film & water in a spritzer bottle
"Circles Box Frame" Stencil, "Grace" Ballerina & mask, "Amazing" from Word Chains Set 9 & the stars from the Wee Folk 3 (Fairies)
Low-tack masking tape
White, Silver & Black pens & a blue Promarker
Perfect Pearls Mists - & the colour I used is "Perfect Pearl"
Brayer, Clarity Stencil Brushes & Blending Tool


If you've been reading Barbara's blog (I strongly recommend it if you haven't - it's a great light-hearted read), you'll know that the piece of Chromo card I've used (available from Claritystamp), was brayered with a couple of blue inks, then a piece of cling film was spritzed with water and laid onto the card and left to dry (Top tip - Be patient!......Go and put the kettle on while you're waiting and make yourself a cuppa!)


Trim the Chromo card to 6x6 and place the stencil centrally to find out where to stamp Grace, then mark in the corners where her head and feet will sit.

Stamp on Grace (not literally of course) using Black Archival ink, placing her head and tippy-toes in between the pencil marks, then mask her off.
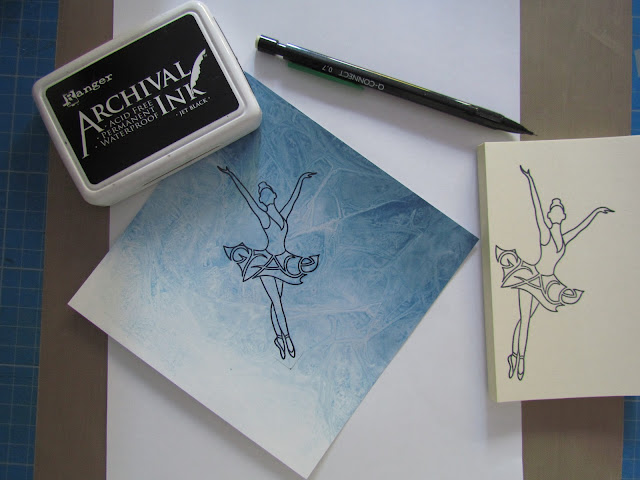


Replace the stencil using low-tack masking tape and using the blending tool, dab through the stencil to get the pattern onto the card, using a little less above Grace's head.  Drag the ink in gently with the make-up sponge.

Spitz with the Perfect Pearl Mists - they're so lovely and well worth investing in!

Remove the stencil and curve "Amazing" on the mount, then stamp in Black Archival above Grace's head!


Next, using a guillotine cut the corners at 45% so that the finished artwork fits onto your base 8x8 card.  Use a black Micron pen to enhance the circles of the stencil (only up as far as Grace's arms), then using the silver pen embellish the design by colouring "Grace" on the skirt and outline "Amazing".  Give Grace some nice eyelashes and a lovely smile with the black Micron pen.
Use the blue Promarker to colour in the bodice of her dress, but be careful not to touch the outline as this will make the line art bleed. 
I never took a photo, but you also need to add shadow around Grace, so I masked her again and used a makeup sponge and Black Soot Distress ink to do this.


Brush the edges of the artwork with Worn Lipstick Distress Ink.......& I felt the need to spritz again with the Perfect Pearls Mists.........so I did!


Thought I'd take a couple of photos to show the card once it had it's final spritz - I love those Perfect Pearls Mists (I couldn't resist buying all the colours available - they add a lovely subtle finish to the artwork), and they catch the light beautifully.


Stamp the base card with the stars using Worn Lipstick and Broken China Distress Inks, then mount the artwork diagonally and trim the base card back to within 1/2" around the artwork.
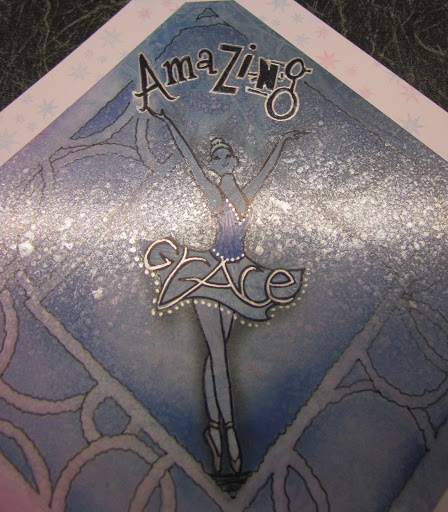
That's basically it.....I hope you like the end result - I think I may well be making this design in different colours too?


By the time you get to my blog, you've probably already checked out the rest of the Design Team's artwork, but if not, there's some fab inspiration there to spur you on to get creative, so take a peek.
I hope you'll put your thinking caps on to have a go at this month's challenge.....There's some very talented crafters out there, and I'm sure you're one of them, so don't be shy to showcase your work, we'd all love to see it!...There's a £50 Clarity voucher up for grabs for the lucky, randomly selected winner.
Not only will this be a Challenge Competition for you to enter, but every month, it sure is "a BIG Challenge" for us too, to choose our Top 5 favourites!!  Have fun creating and I'll be looking out for your artwork.
Until my next post, hugs to you all xxx